
API Gateway
Helix API gateway tutorial: Design and deploy enterprise APIs

Updated on:
April 21, 2026
1. Helix Gateway helps you design, secure, and deploy APIs in minutes through a no-code API Wizard, eliminating DevOps complexity.
2. It comes with out-of-the-box support for MCP-compliant APIs makes your services consumable by LLMs and AI agents without extra setup.
3. Helix is built for modern, distributed systems, offering low latency, flexible multi-cloud deployment, and a minimal operational footprint.
4. You get a unified API estate dashboard that centralizes discovery, documentation, testing, and compliance for every API across your org.
5. Go beyond runtime, Helix lets you publish and monetize APIs as products with integrated billing, analytics, and access control.
Ready to experience it yourself? Explore Helix Gateway and see how effortless API management can be.
APIs are the invisible threads connecting every modern enterprise, from mobile apps to AI agents. But as systems grow complex and distributed, managing those connections securely and efficiently becomes a challenge. That’s where an API gateway comes in.
In this API Gateway Tutorial, we’ll explore how to create, secure, and deploy APIs effortlessly using Helix Gateway, DigitalAPI’s lightweight, AI-ready platform. Whether you’re an architect building your first microservice or a platform engineer modernizing legacy APIs, this guide will help you design, configure, and launch APIs in minutes, not days. Let’s dive into how Helix simplifies everything from designing to deploying and managing APIs.
What is an API gateway (And why you still need one)
An API gateway is the central entry point that manages, routes, and secures API requests between clients and backend services. It acts as a reverse proxy, handling authentication, rate limiting, traffic control, and monitoring, so developers can focus on building features instead of managing complex integrations and policies across distributed systems.
Why you still need one:
- Unified security layer: Enforces consistent authentication, authorization, and threat protection across all APIs.
- Traffic control: Manages rate limits, quotas, and load balancing to prevent overload and ensure performance stability.
- Simplified developer experience: Offers a single endpoint for clients, reducing complexity in API consumption.
- Centralized observability: Provides analytics, logs, and insights into API performance and usage patterns.
- Scalability & resilience: Helps scale backend services dynamically without changing client integrations.
- Monetization readiness: Enables packaging and exposing APIs as products for internal or partner consumption with billing support.
Introducing Helix Gateway: What makes it different?
The Helix Gateway is built for the modern API-first enterprise: it’s the lightest, fastest API gateway you’ll find, designed to help you create, secure, and deploy APIs with minimal DevOps overhead. Helix Gateway delivers zero-learning-curve onboarding, immediate support for agent-consumable (MCP-compliant) APIs, and a startup-friendly pricing model.
Here are the key differentiators:
- Plug-&-play deployment: You can “secure, configure, and monitor your APIs in minutes” thanks to the minimal setup and lightweight execution.
- Out-of-the-box AI/Agent-readiness: Helix supports MCP-compliant APIs (making them friendly for LLMs and AI agents) without manual conversion or rewrites.
- Built-in monetization support: While many gateways stop at runtime, Helix allows you to publish APIs as products and monetize them (via its marketplace integration).
- Low latency & high performance: The architecture emphasises lightweight routing, connection pooling, and response caching to boost real-time API performance.
- Minimal ops burden: It’s built to ensure “zero-DevOps overhead to let developers focus on designing and deploying APIs rather than maintaining infrastructure.
- Flexible deployment scenarios: Whether you’re in public cloud, private data centre, or edge environments, Helix claims you can deploy with “zero governance issues”.
.png)
Step-by-step Helix API gateway tutorial to design and deploy APIs
On Helix Gateway, you can design and deploy APIs in just minutes using API Wizard, a clean, no-code API designer built by DigitalAPI. The guided workflow makes it easy to define your API structure, configure policies, and publish securely without complex setup. Once deployed, you can manage governance, apply traffic and security controls, run tests, and even check for duplicates directly from the API Estate dashboard, your central view of all active APIs.
Let’s start the API gateway tutorial with the steps on how to design and deploy your APs on Helix.
1. Create your API
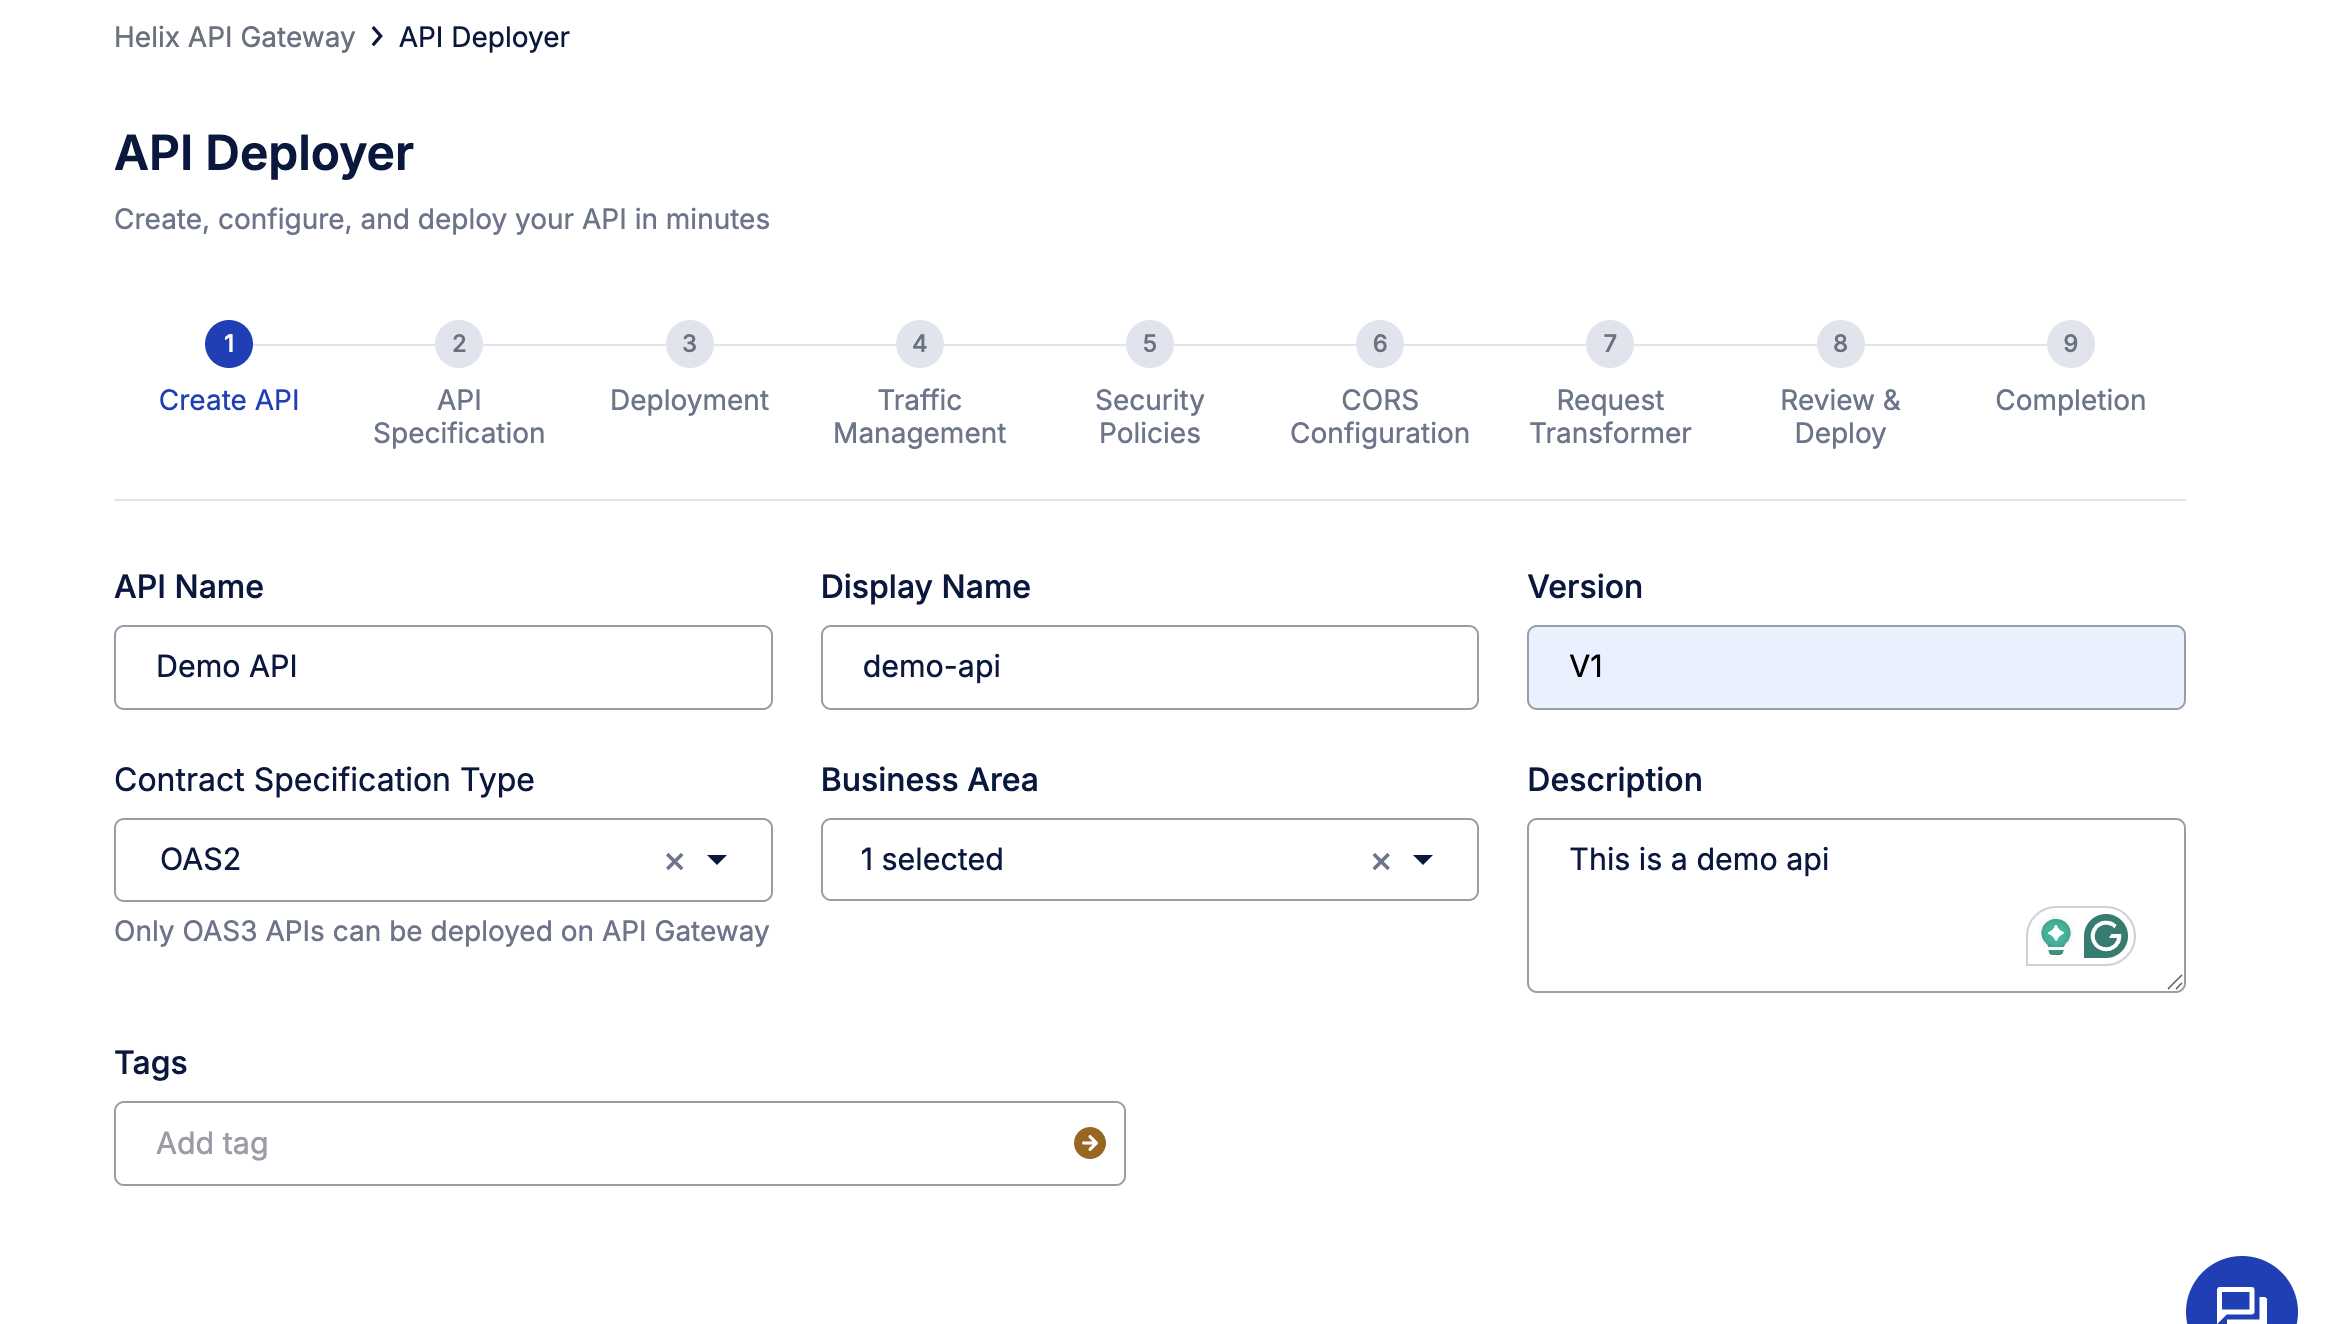
Once you log into Helix Gateway, head to the API Deployer. This is where you can create, configure, and deploy your API — all in a few guided steps. Start by entering your API details:
- API Name & Display Name: Give your API a clear identifier, e.g., Demo API.
- Version: Define the version (e.g., v1) to maintain clarity across iterations.
- Contract Specification Type: Choose the format for your API definition. Helix supports OAS2, OAS3, GRAPHQL, RAML, ASYNC, & WSDL standards.
- Business Area: Tag the API under the relevant business function for easier categorization and visibility.
- Description & Tags: Add context for your team and searchable metadata to simplify future discovery.
This step essentially defines your API blueprint, the foundation for everything you’ll configure next, from traffic to security.
2. Upload your API specification
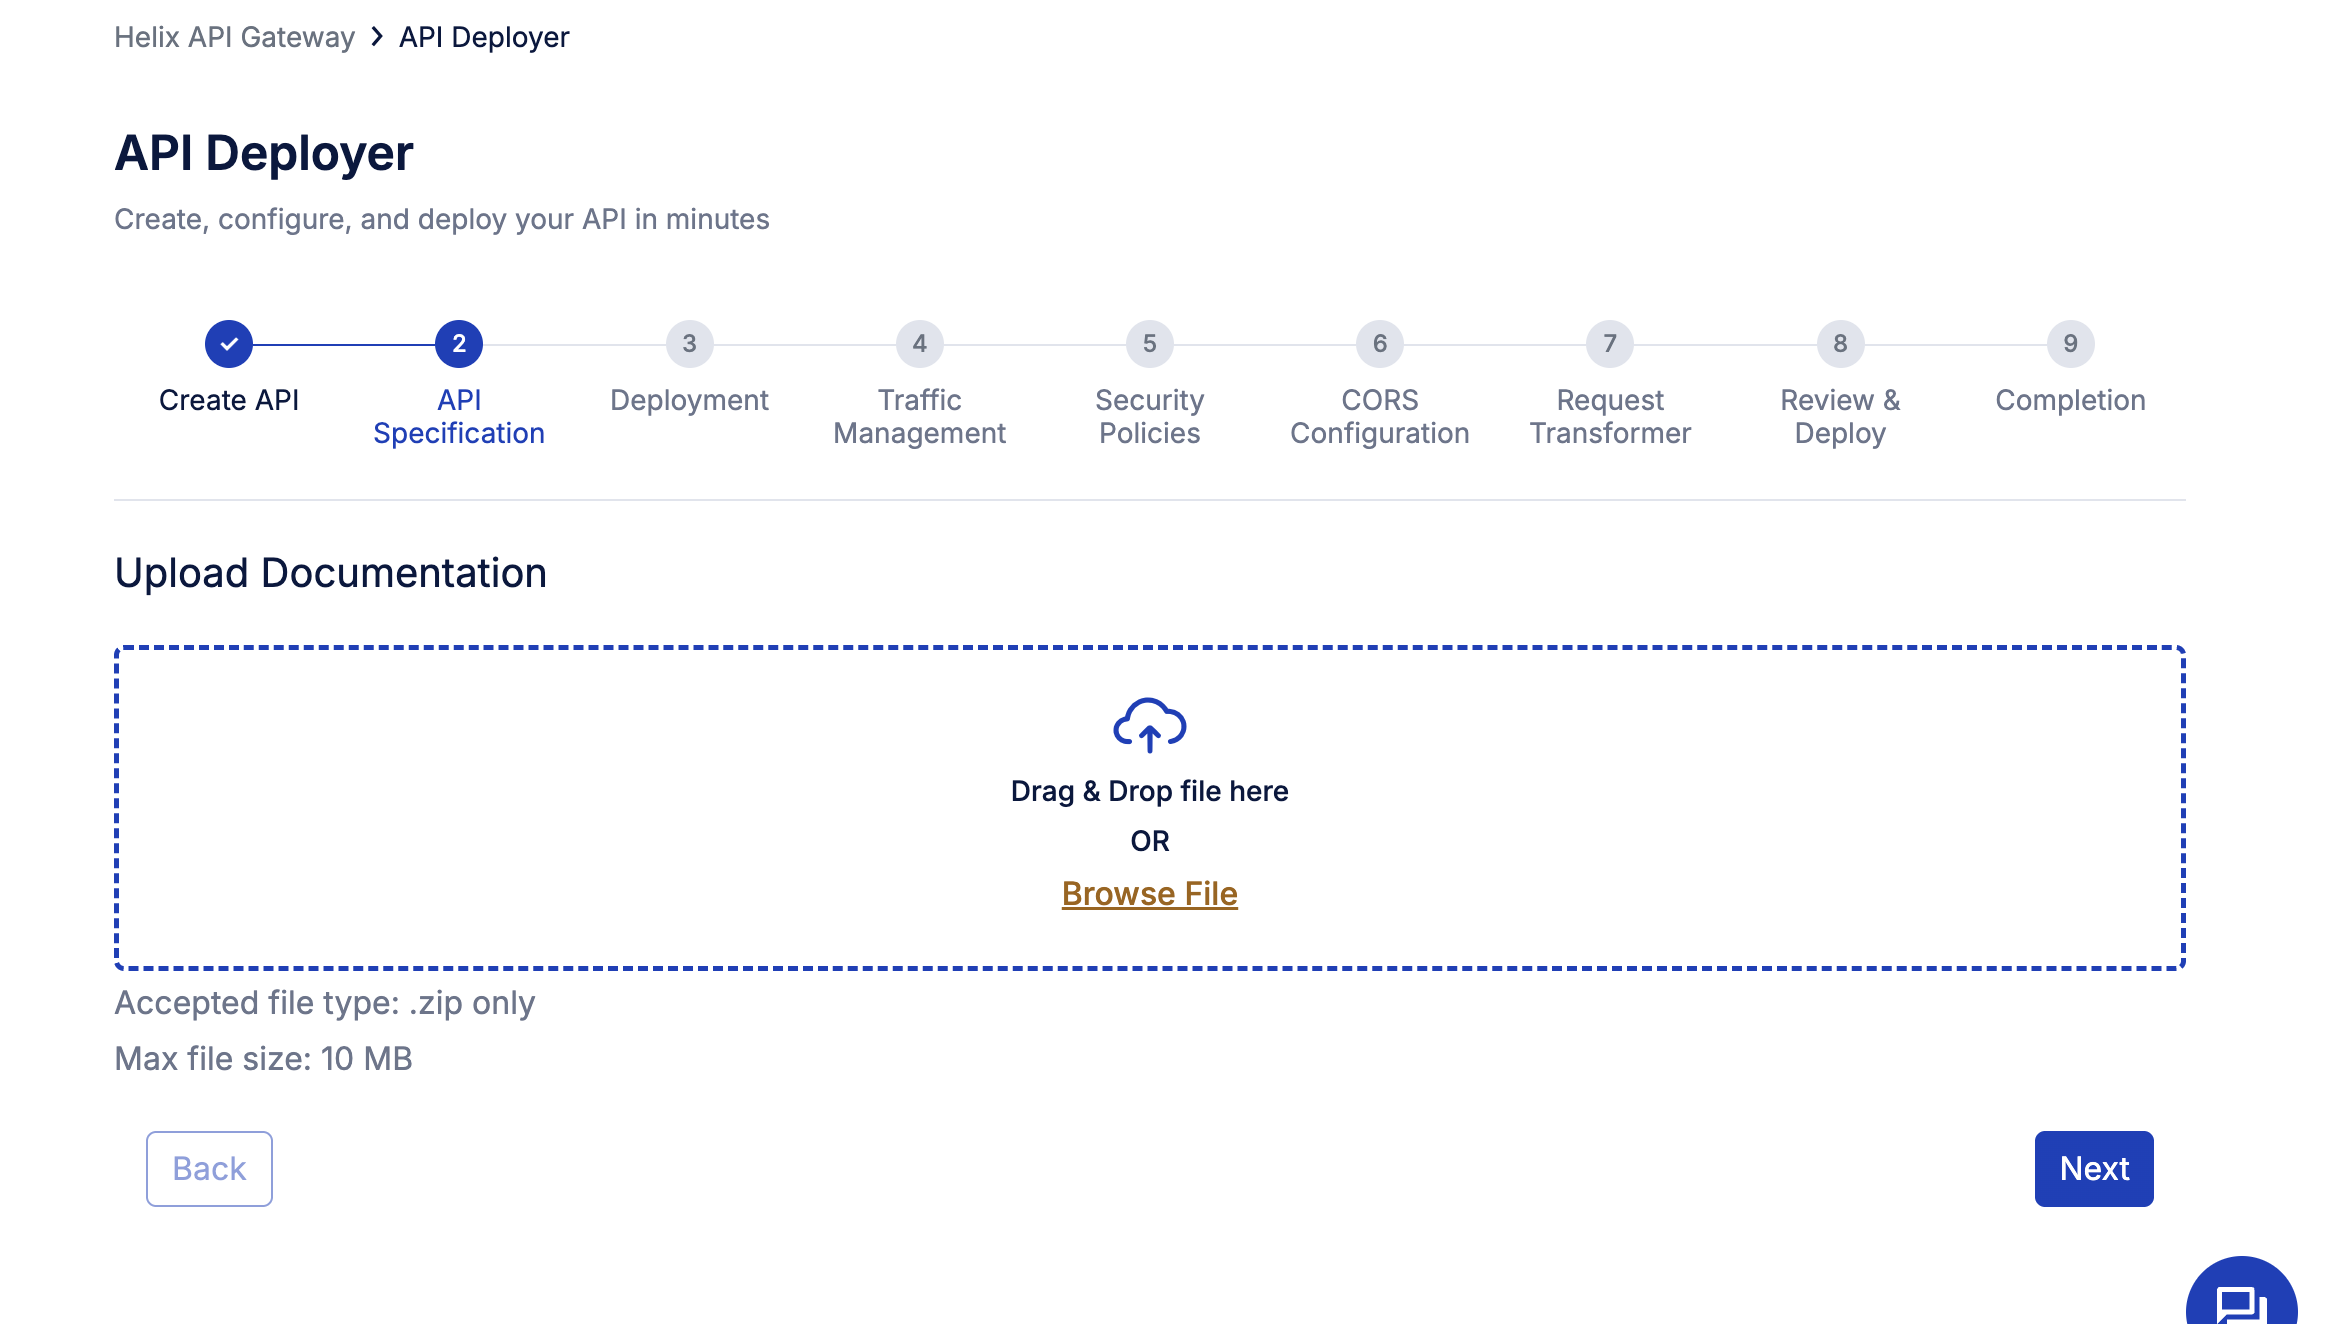
After defining your API details, the next step is to upload your API specification, the document that tells Helix Gateway how your API behaves. Simply drag and drop your OpenAPI/Swagger file into the Upload Documentation box, or click Browse File to select it manually.
Helix accepts .zip files (up to 10 MB), which can include your OpenAPI definitions, schema, and documentation.
This file defines your API’s structure, endpoints, parameters, request/response formats, and supported methods, so Helix can automatically generate routes and enforce policies. Once uploaded, click next to proceed to deployment configuration.
Tip: Using a clean OpenAPI 3.0 spec ensures smoother policy application and accurate request validation later.
3. Choose your deployment gateway
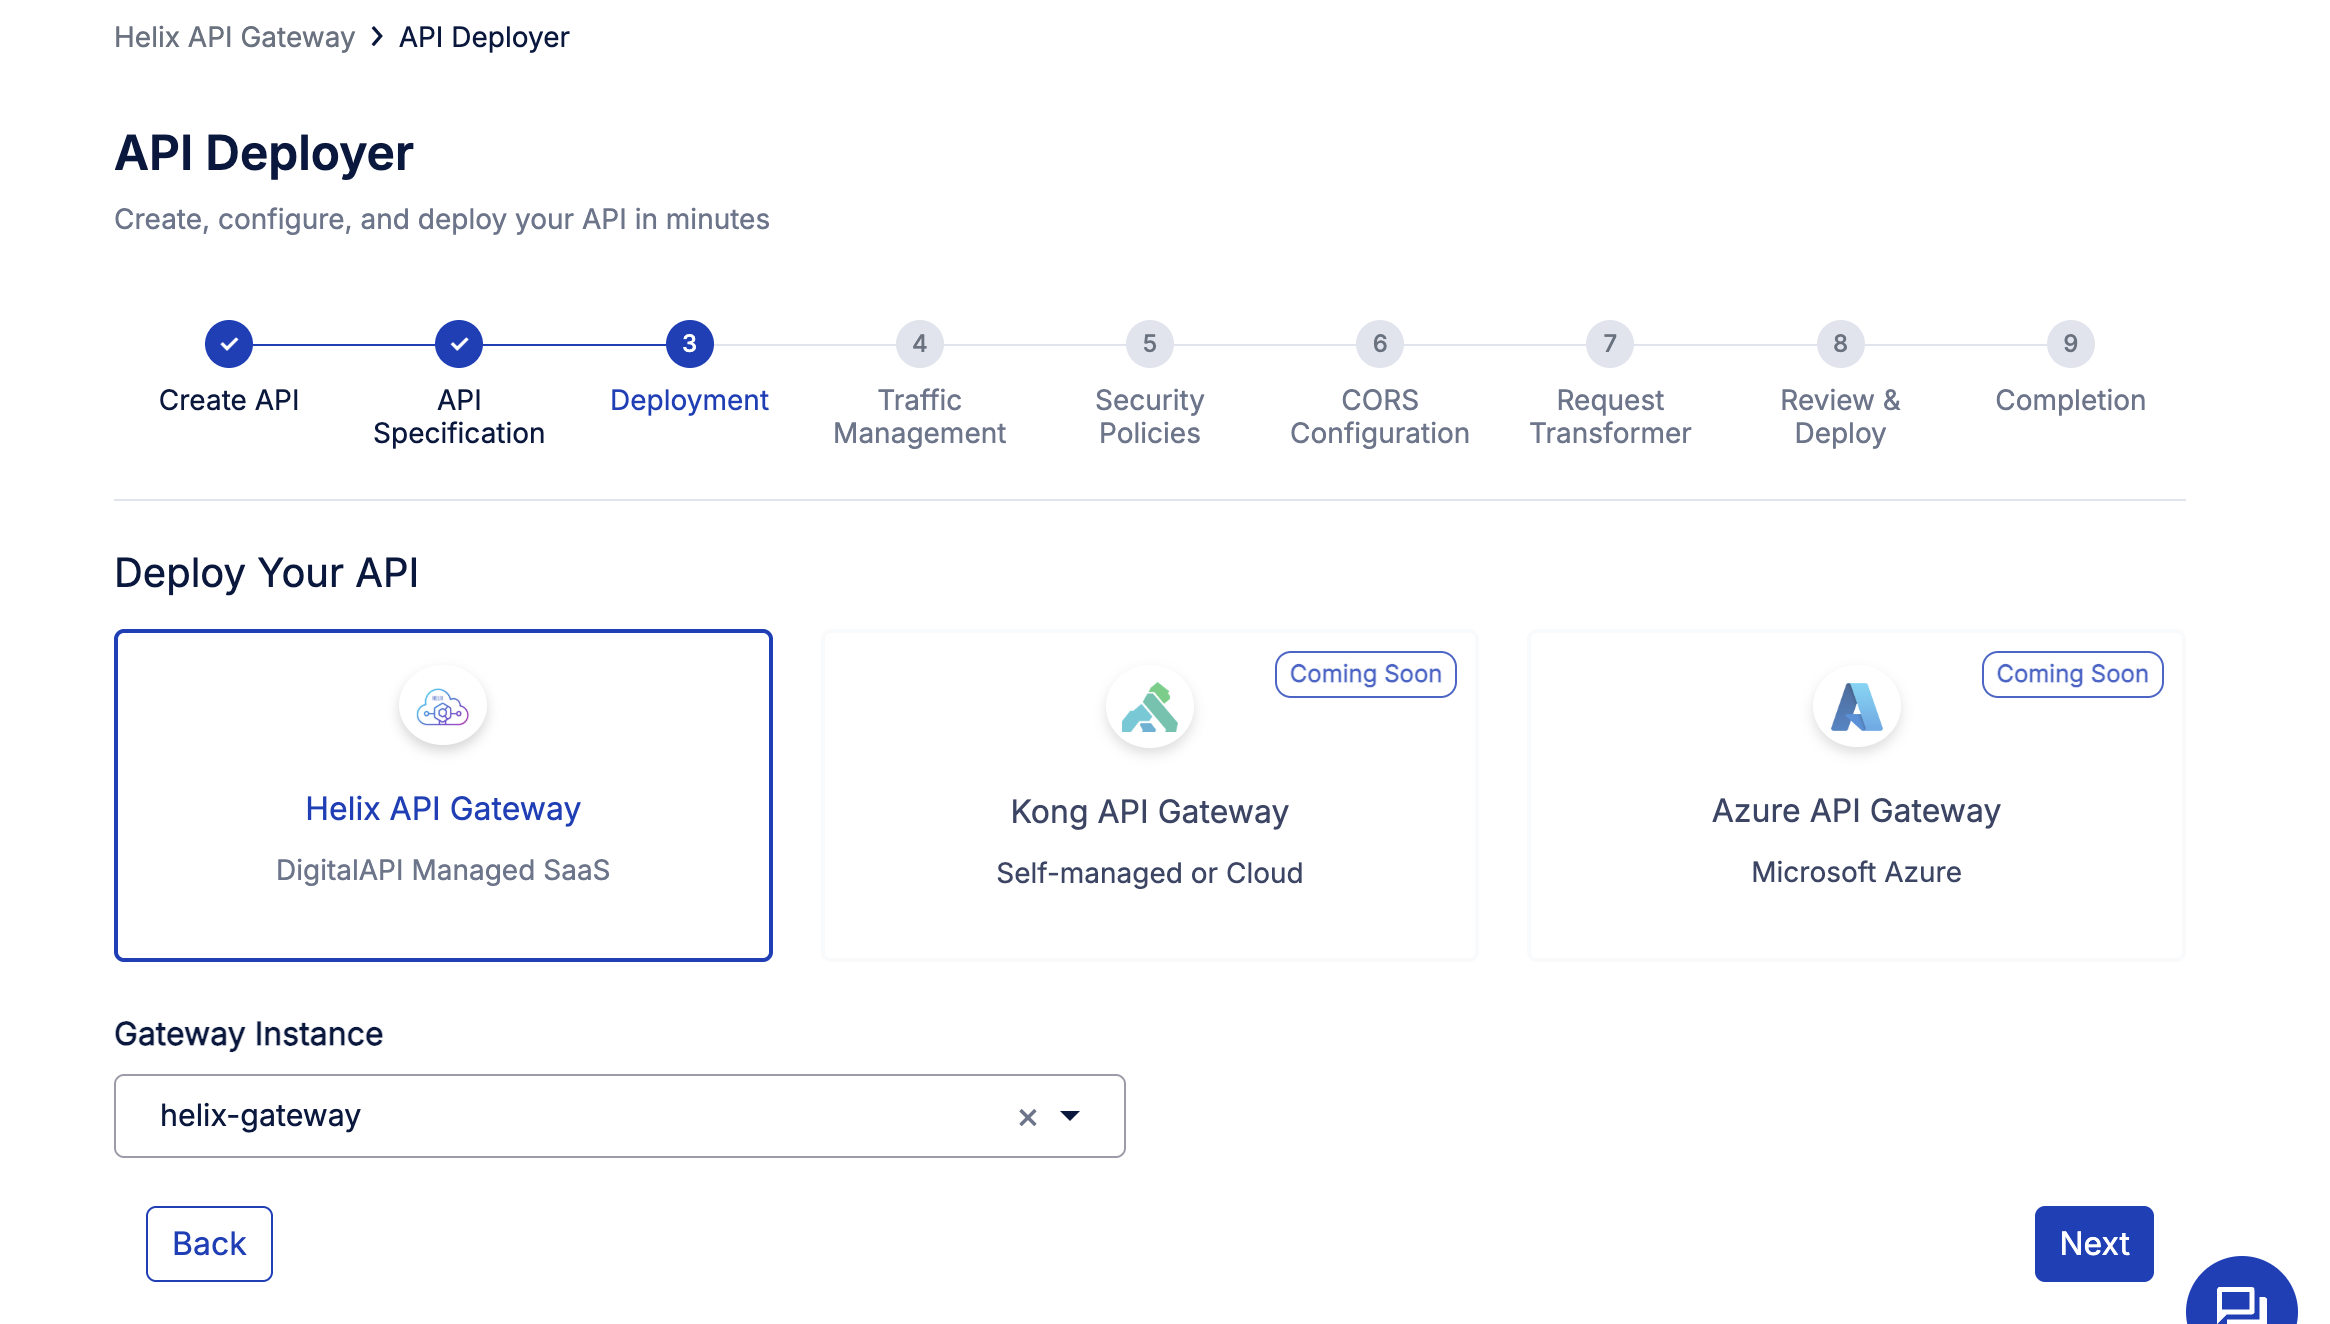
With your API specification uploaded, it’s time to deploy. In this step, you’ll choose where your API will live and run.
Select Helix API Gateway, which is DigitalAPI’s fully managed SaaS gateway, optimized for lightweight, high-performance API execution.
Note: Right now, we only support designing and deploying APIs to Helix Gateway, but more Gateways will be supported soon.
4. Configure traffic management policies
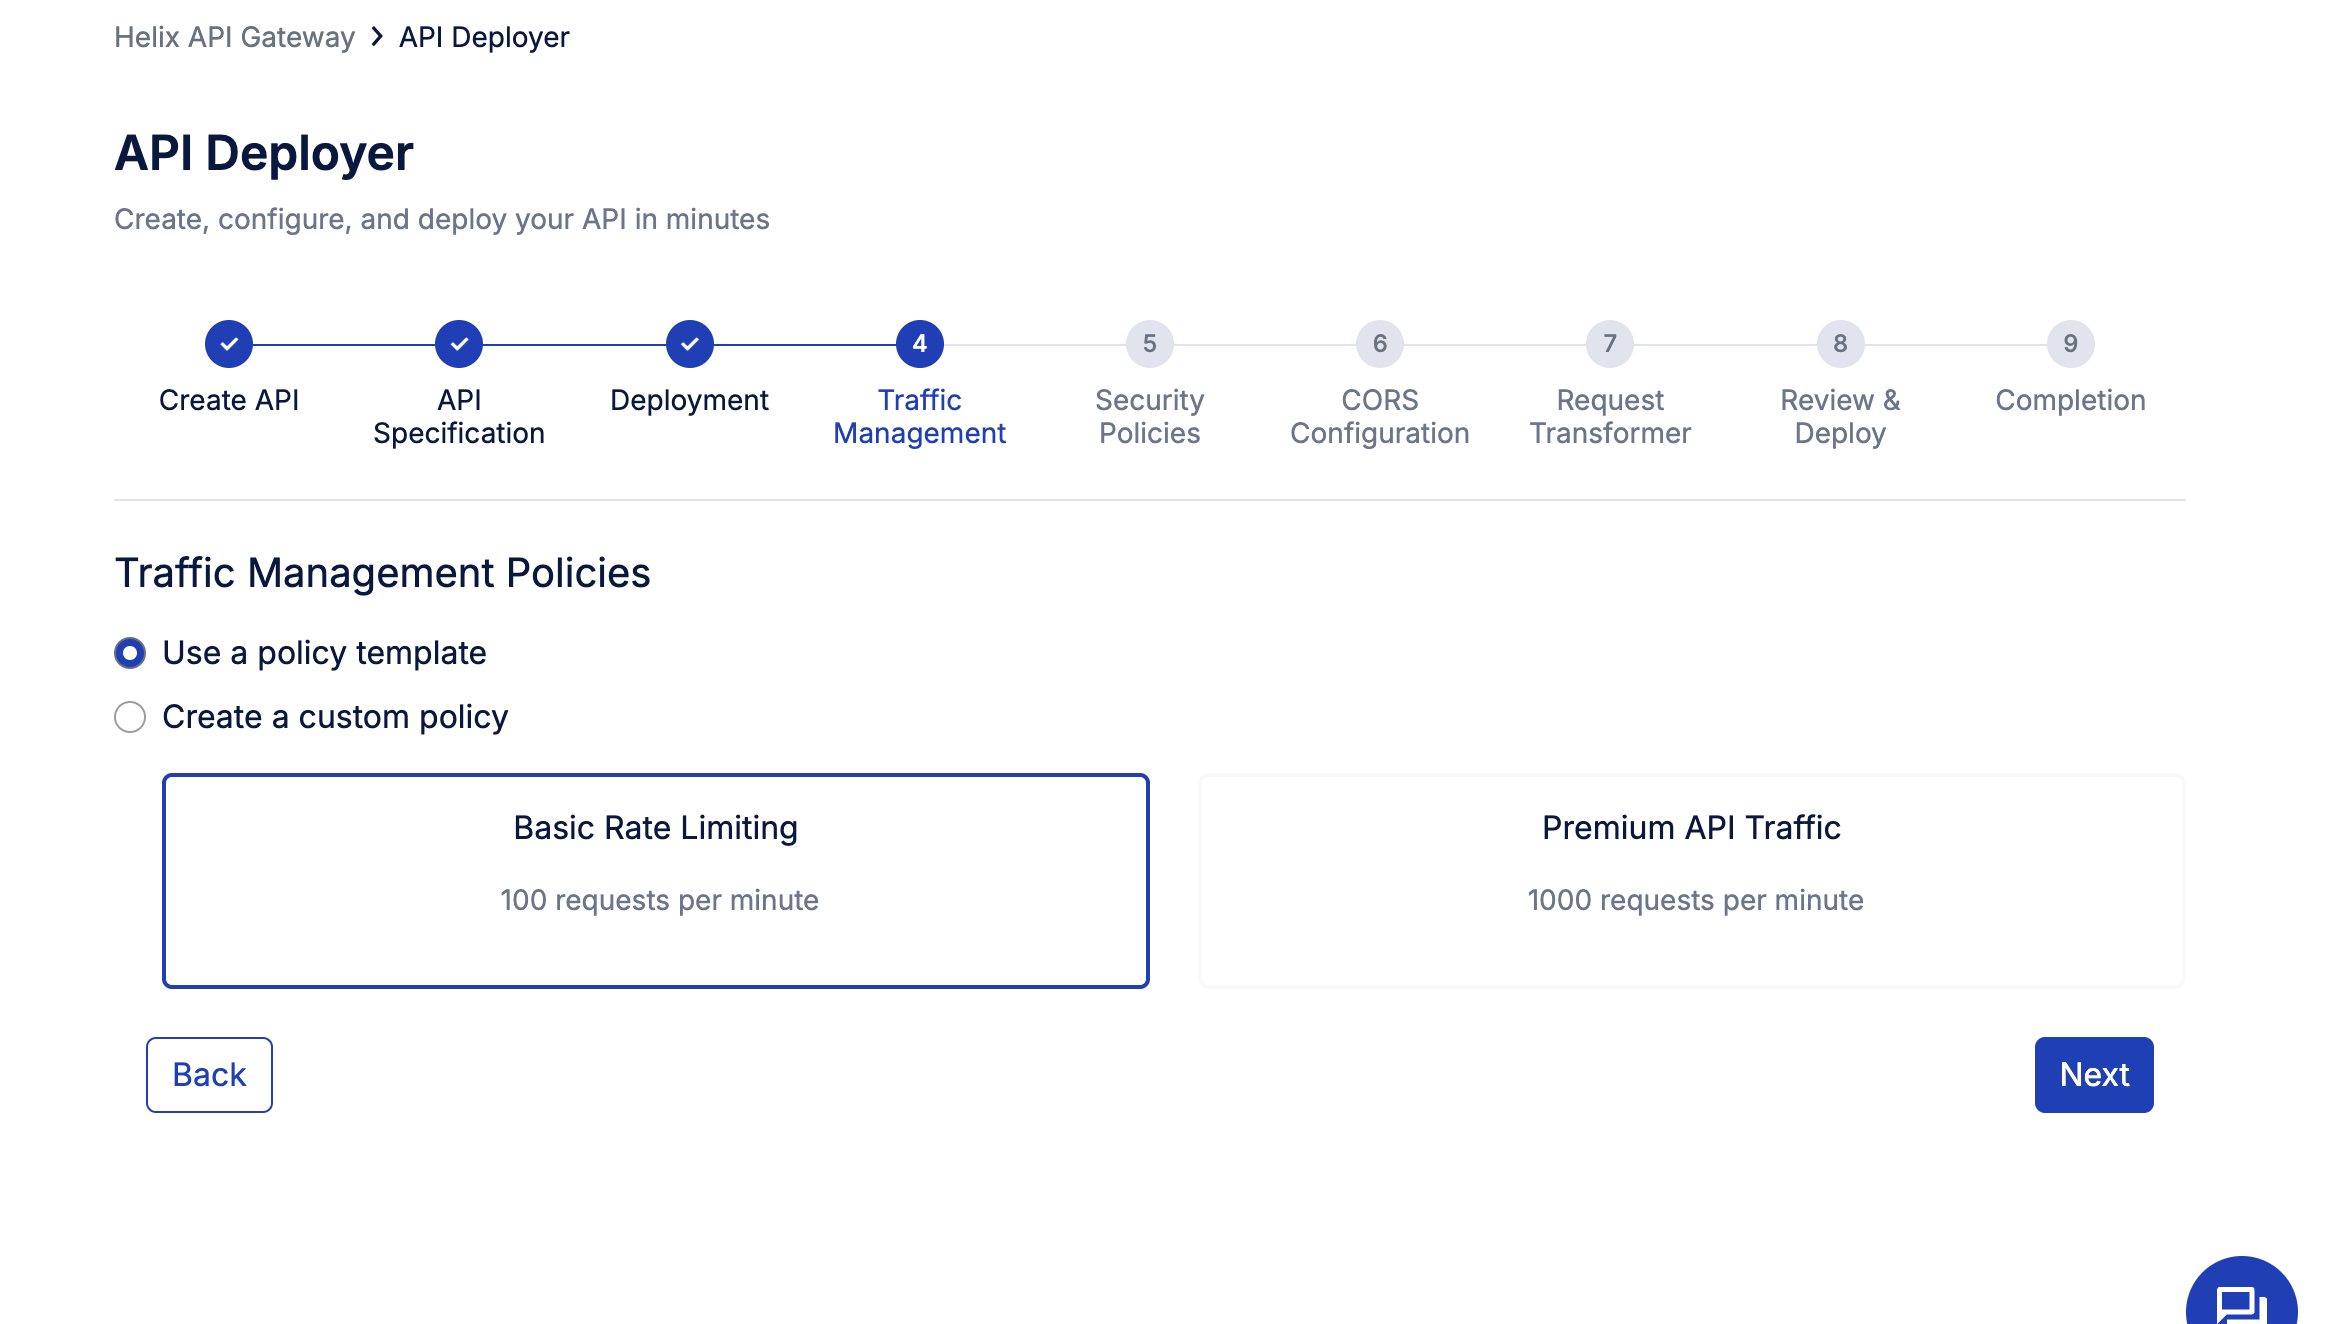
Traffic management ensures your API remains performant and reliable, even under varying loads. In Helix Gateway, you can either use a predefined policy template or create your own custom policy based on business needs.
You’ll see two simple options:
- Use a policy template: Choose from ready-to-apply rate-limiting presets, such as:
- Basic Rate Limiting – allows 100 requests per minute
- Premium API Traffic – allows 1000 requests per minute
These are ideal for quick deployments or tiered access control.
- Create a custom policy: For granular control, define your own parameters:
- Apply to: Select Service/route to enforce limits per API service.
- Policy: Choose Local or other scoping methods.
- Max requests & time period: Example, limit 100 requests per minute for consistent traffic flow.
5. Set up security policies
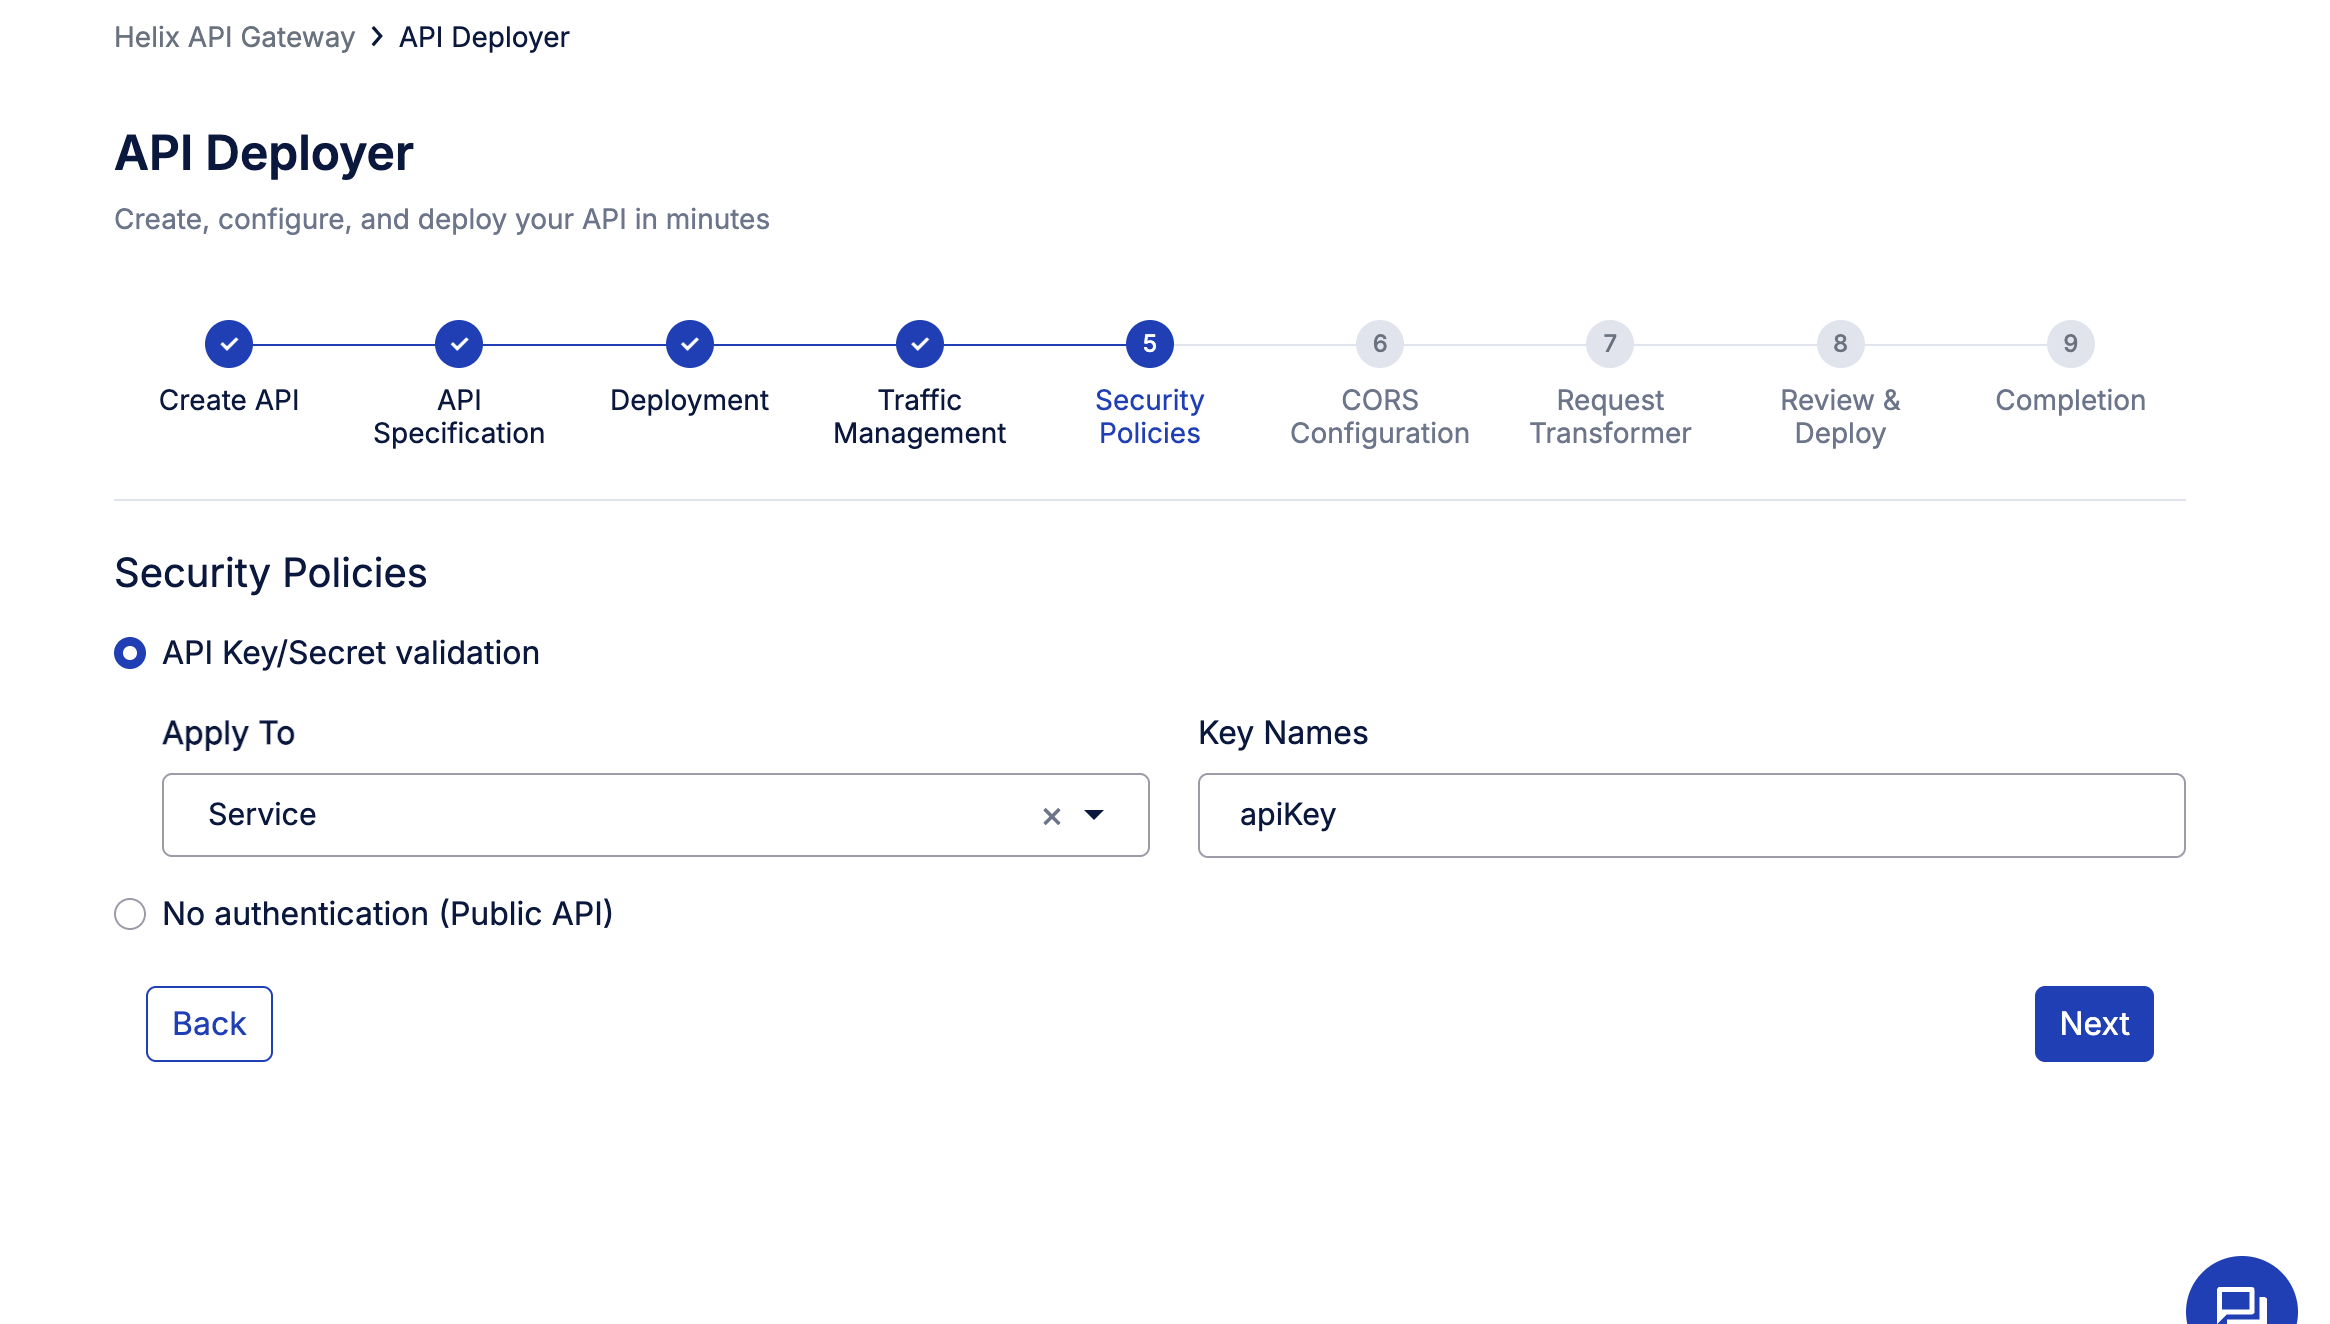
Security is a core part of every API deployment, and Helix makes it effortless to enforce authentication with just a few clicks. In this step, you can choose how your API will handle access control:
- API Key/Secret Validation:
Enable this option to ensure that every request sent to your API is authenticated using a valid API key.- Apply To: Select Service/route to secure the entire API service.
- Key Name: Define the key header name (e.g., apiKey). This setup ensures that only authorized clients can access your endpoints, protecting your backend from unauthorized or excessive calls.
- No Authentication (Public API): If your API is meant for open access or internal testing, you can disable authentication entirely.
6. Configure CORS (Cross-Origin Resource Sharing)
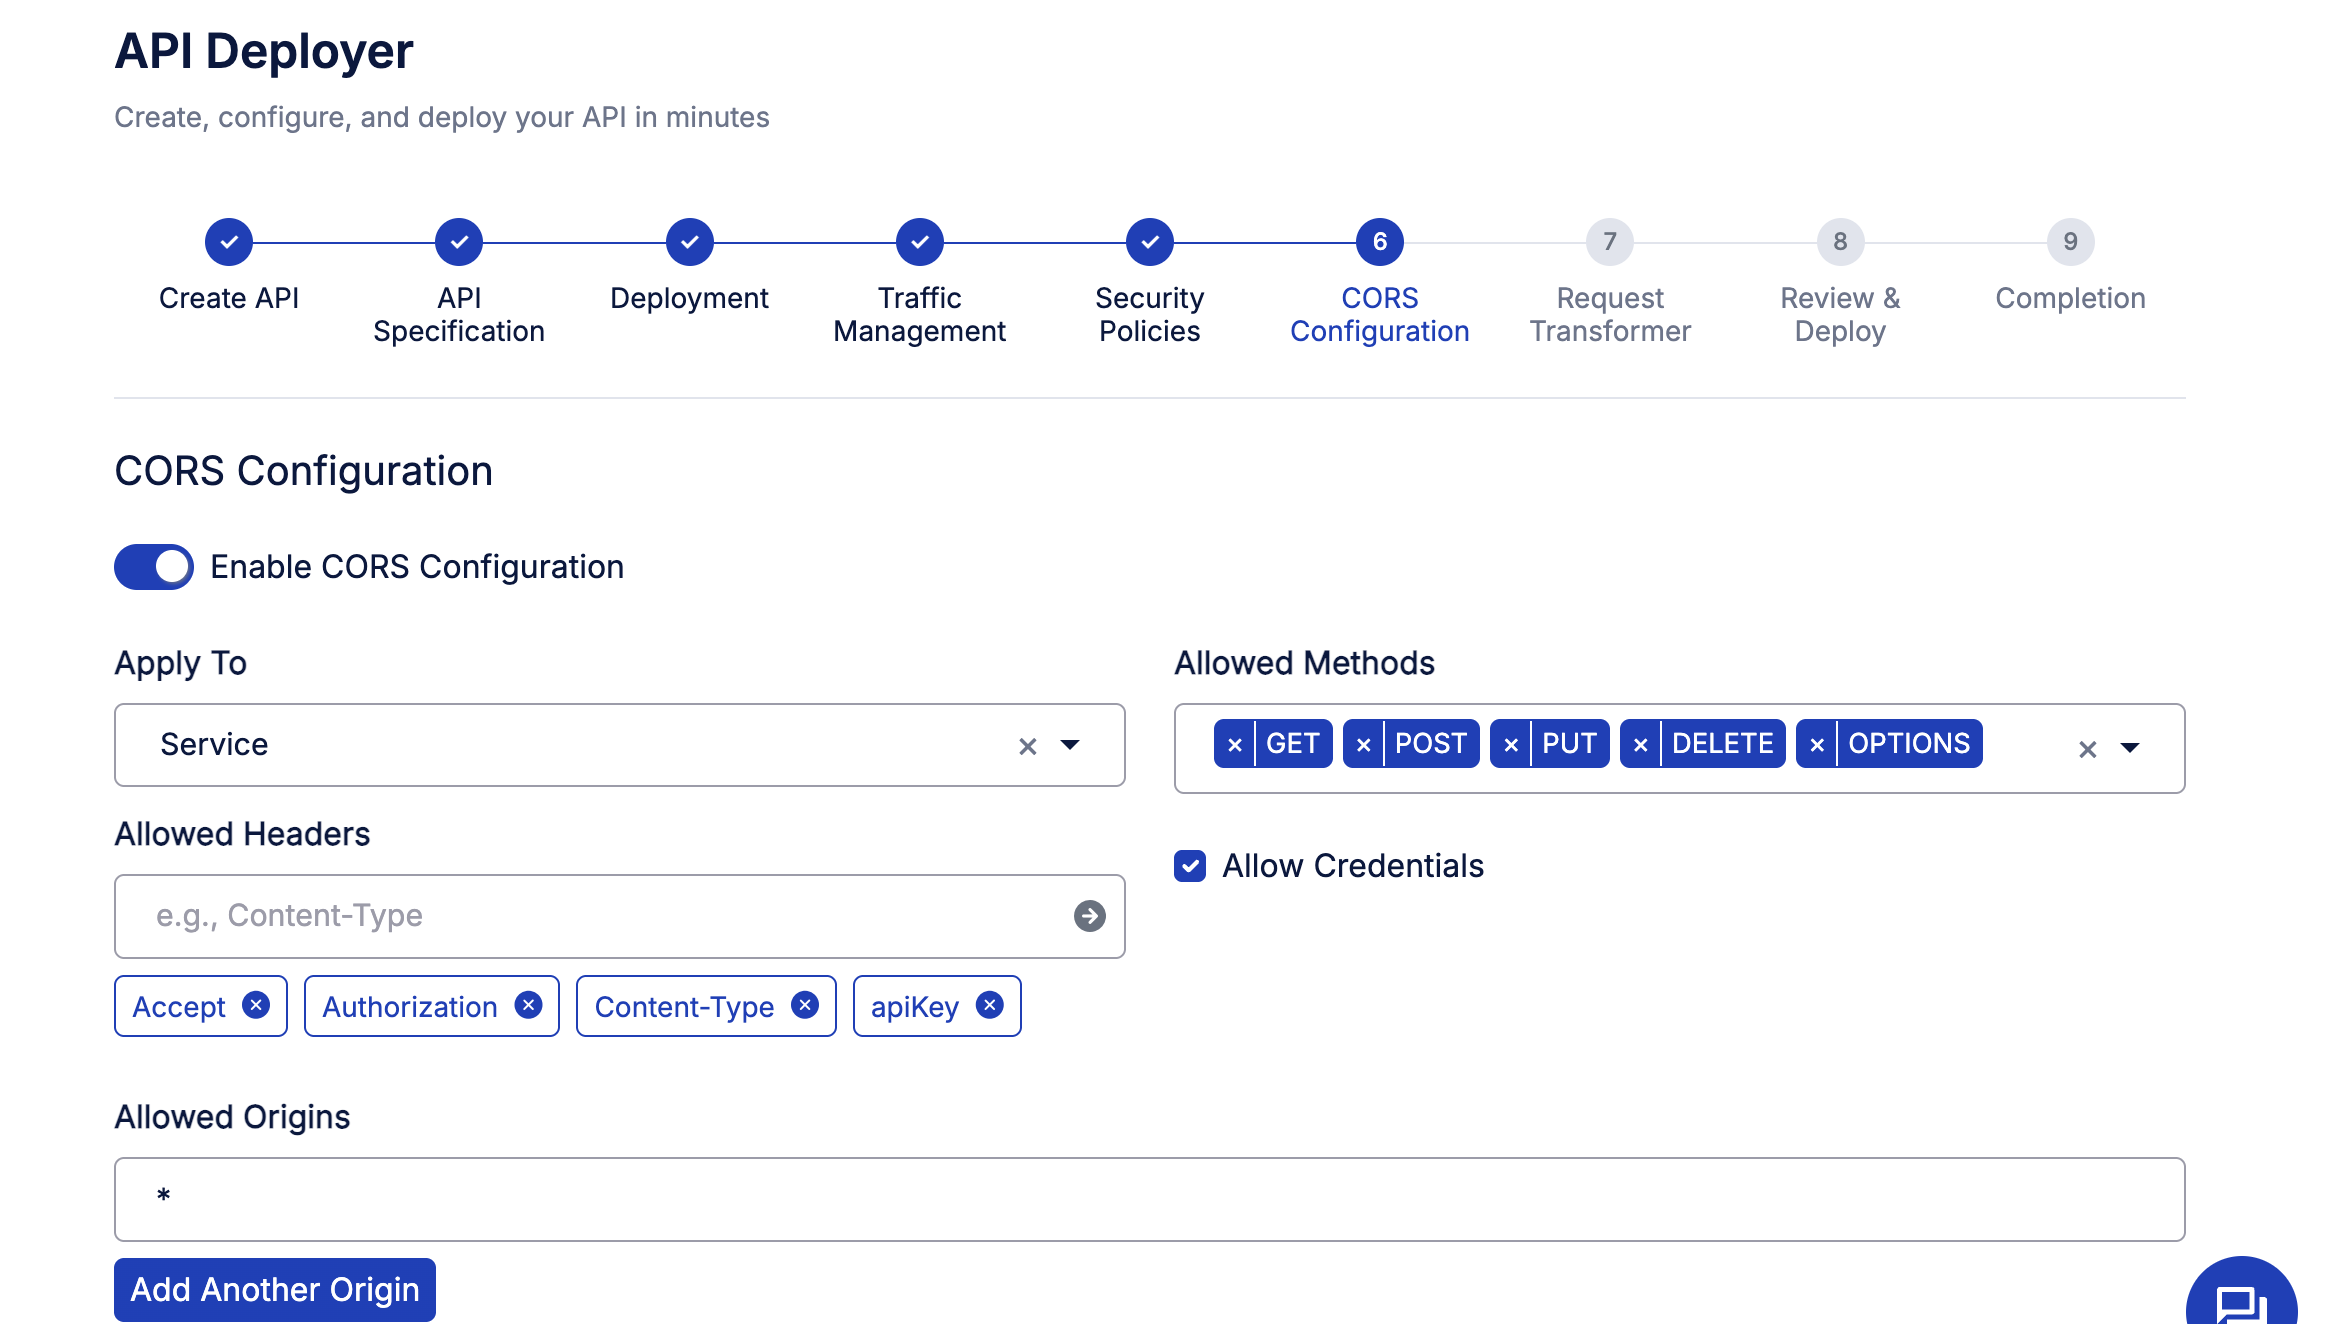
CORS policies define how your API can be accessed from different domains, an essential configuration for web and mobile apps that make browser-based requests.
In this step, toggle “Enable CORS Configuration” to activate CORS for your API and set the following parameters:
- Apply to: Select the Service/route to apply CORS settings.
- Allowed methods: Specify which HTTP methods your API supports, typically GET, POST, PUT, DELETE, and OPTIONS.
- Allowed headers: Include headers like Accept, Authorization, Content-Type, and apiKey to allow authenticated and structured requests.
- Allowed origins: Set the origin domains that can access your API. Using * allows all domains (useful for testing).
- Allow credentials: Enable this if your API needs to handle cookies or auth tokens.
Pro tip: For production APIs, restrict Allowed Origins to trusted domains to avoid cross-site request risks.
7. Configure request transformer
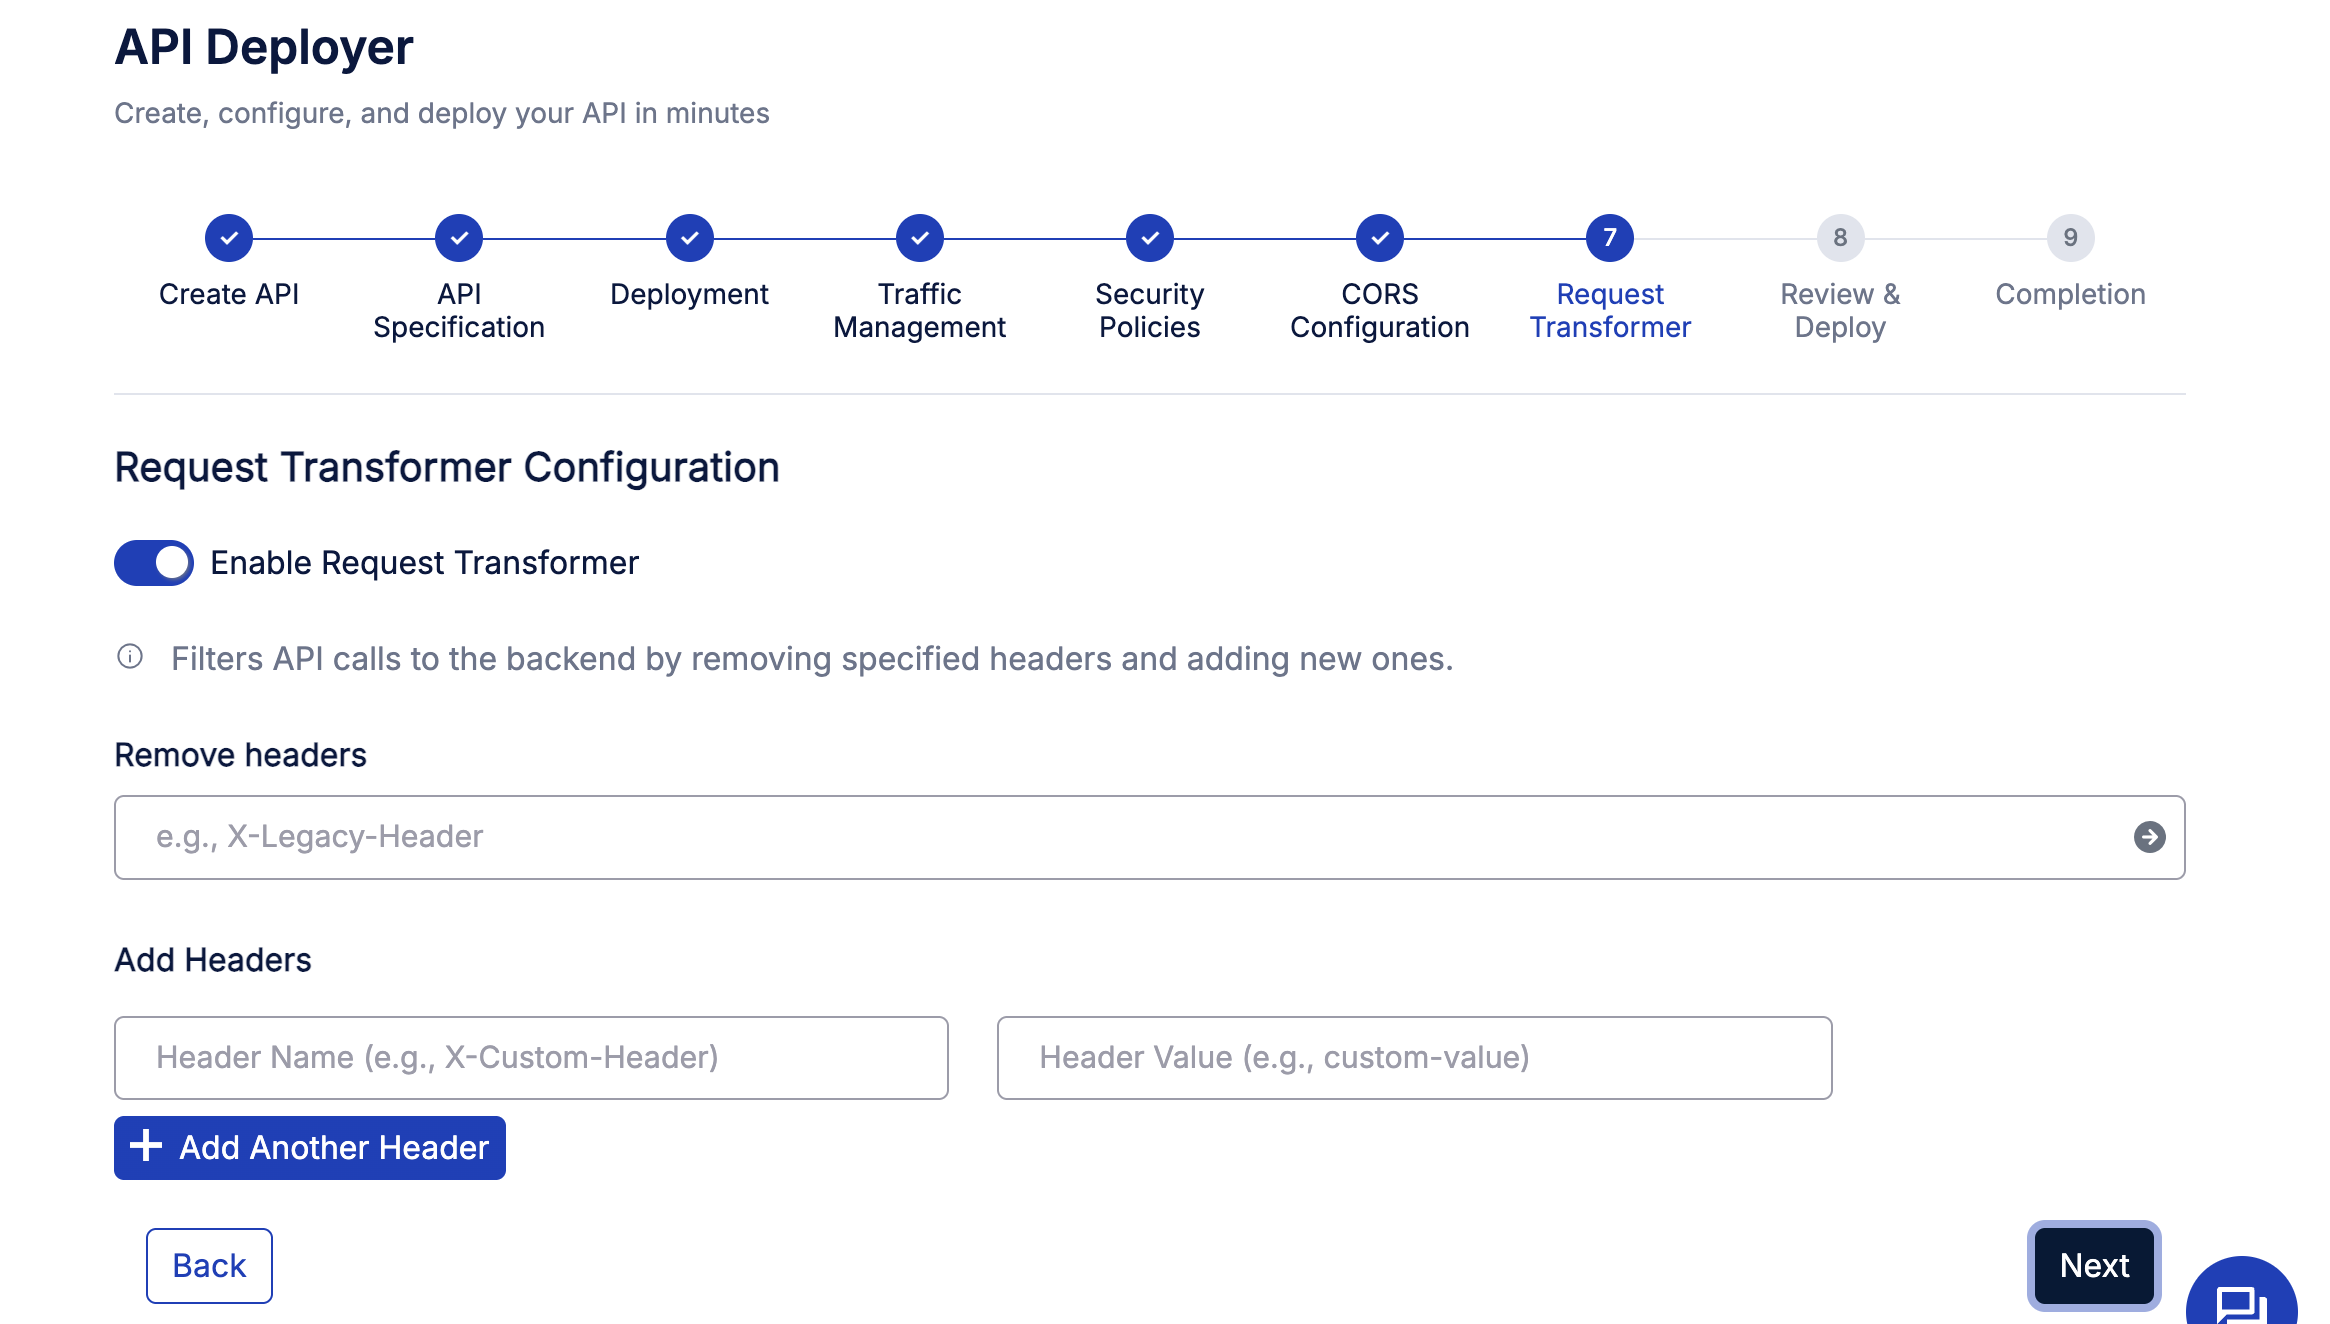
The Request Transformer in Helix Gateway lets you fine-tune how API requests are sent to your backend, ensuring compatibility, security, and cleaner payloads. So, enable the toggle for “Request Transformer Configuration.
This feature allows you to modify HTTP headers on the fly before they reach your backend service.
You can:
- Remove headers: Strip away unwanted or deprecated headers (e.g., X-Legacy-Header) to prevent unnecessary data from being forwarded.
- Add headers: Inject new headers, such as custom identifiers or environment markers — for example,
- Header Name: X-Custom-Header
- Header Value: prod-instance
These transformations help standardize requests across different clients or environments without changing the API code.
8. Review & deploy your API

Before finalizing deployment, Helix Gateway provides a clear summary of all your configurations so you can double-check every setting at a glance.
9. Completion—your API is live!
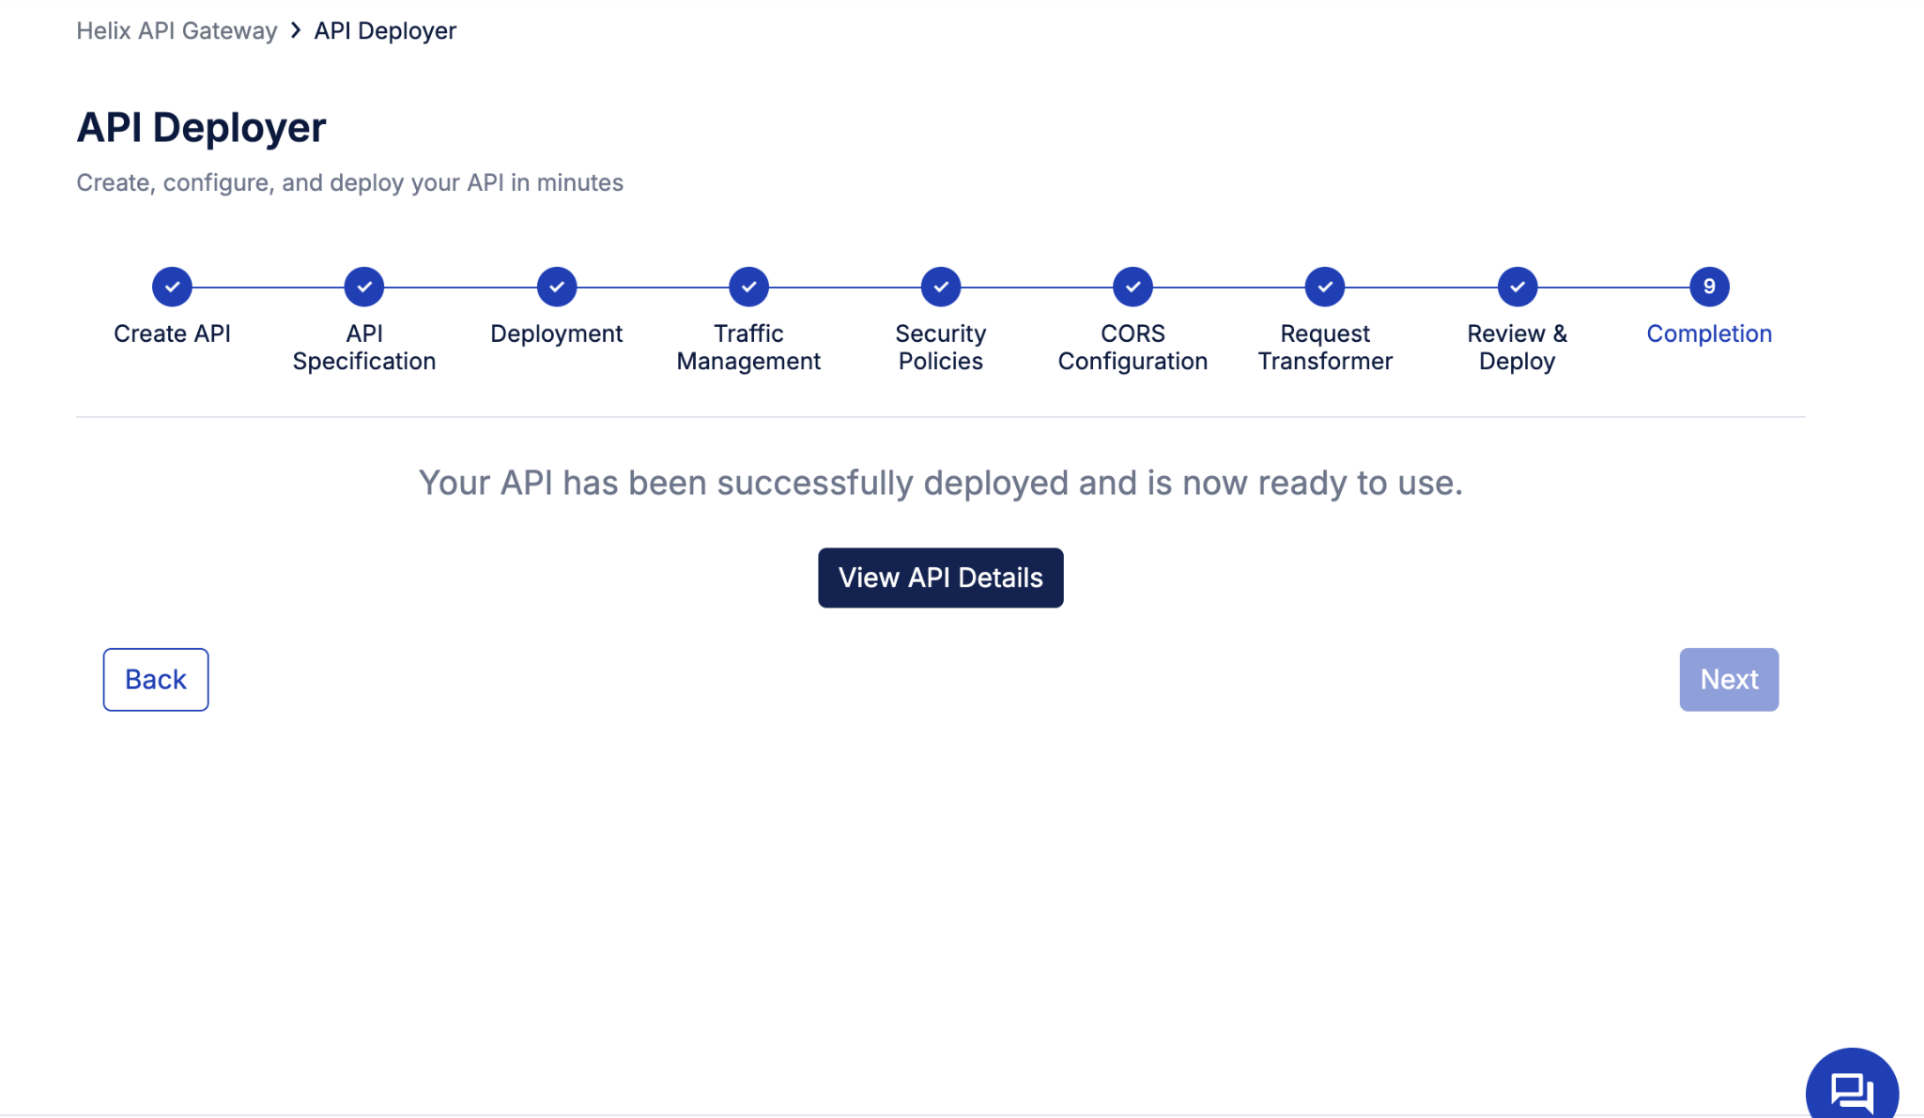
Congratulations, you’ve just deployed your first API using Helix Gateway!
Once all configurations are complete, Helix confirms successful deployment with a simple message: “Your API has been successfully deployed and is now ready to use.”
Click on view API details to access your API’s, check documentation, test them, and check the analytics dashboard.
What sets Helix apart is the speed; you’ve just gone from design to deployment in minutes, not hours. The process is intuitive, transparent, and fully automated, reflecting Helix’s goal of making API management effortless for developers and platform teams alike.
Manage your APIs on Helix API Gateway
Managing APIs in Helix Gateway is simple and intuitive. From the API Estate dashboard, you can view all your APIs, internal, external, or public, in one place. It lets you search, filter, monitor, and organize APIs effortlessly while maintaining full visibility into versioning, ownership, and governance. Here, you can:
1. Browse and auto-generate documentation

Helix Gateway makes API documentation effortless to create, edit, and maintain. From the Documentation tab within the API’s detail view, you can view existing docs, upload new ones, or automatically generate updated documentation with a single click using the Generate Documentation option. Helix ensures your documentation stays versioned, consistent, and always in sync with your API specification, all within the same dashboard.
2. Managing API Metadata
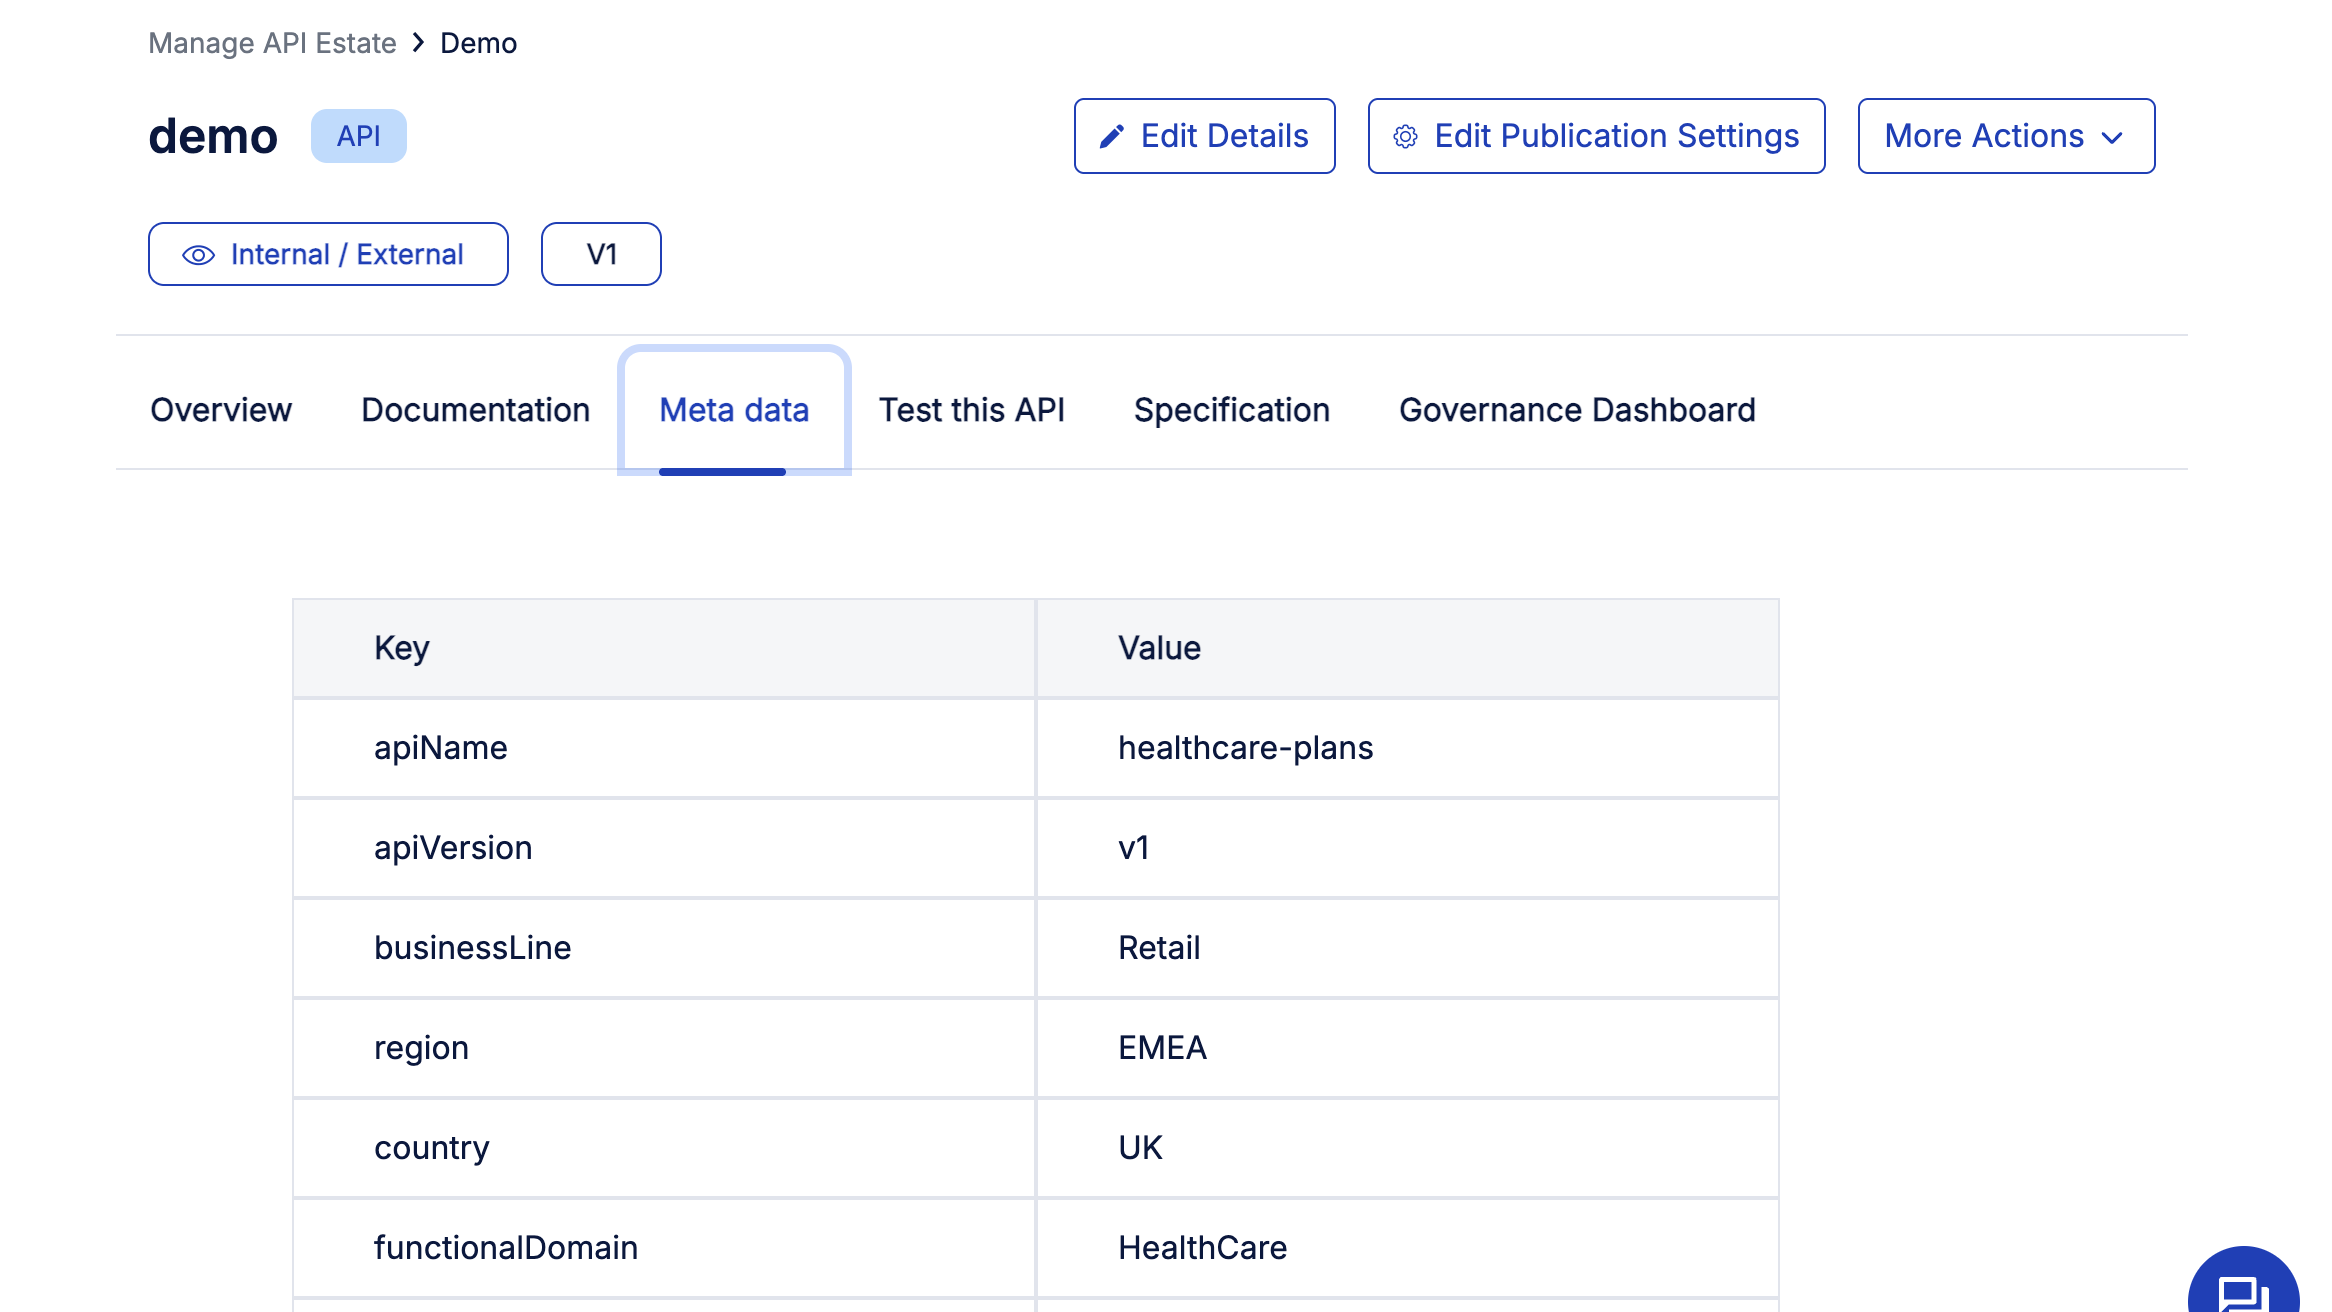
Every API in Helix Gateway carries rich metadata that helps categorize and govern it effectively across business lines, regions, and domains. Under the Metadata tab, you can view key attributes such as API name, version, business line, region, country, and functional domain.
This structured metadata improves searchability within the API Estate and ensures governance teams can easily identify ownership, compliance scope, and usage context. For example, a healthcare API under the retail business line in the EMEA region can be filtered instantly for auditing or reporting.
3. Testing your API
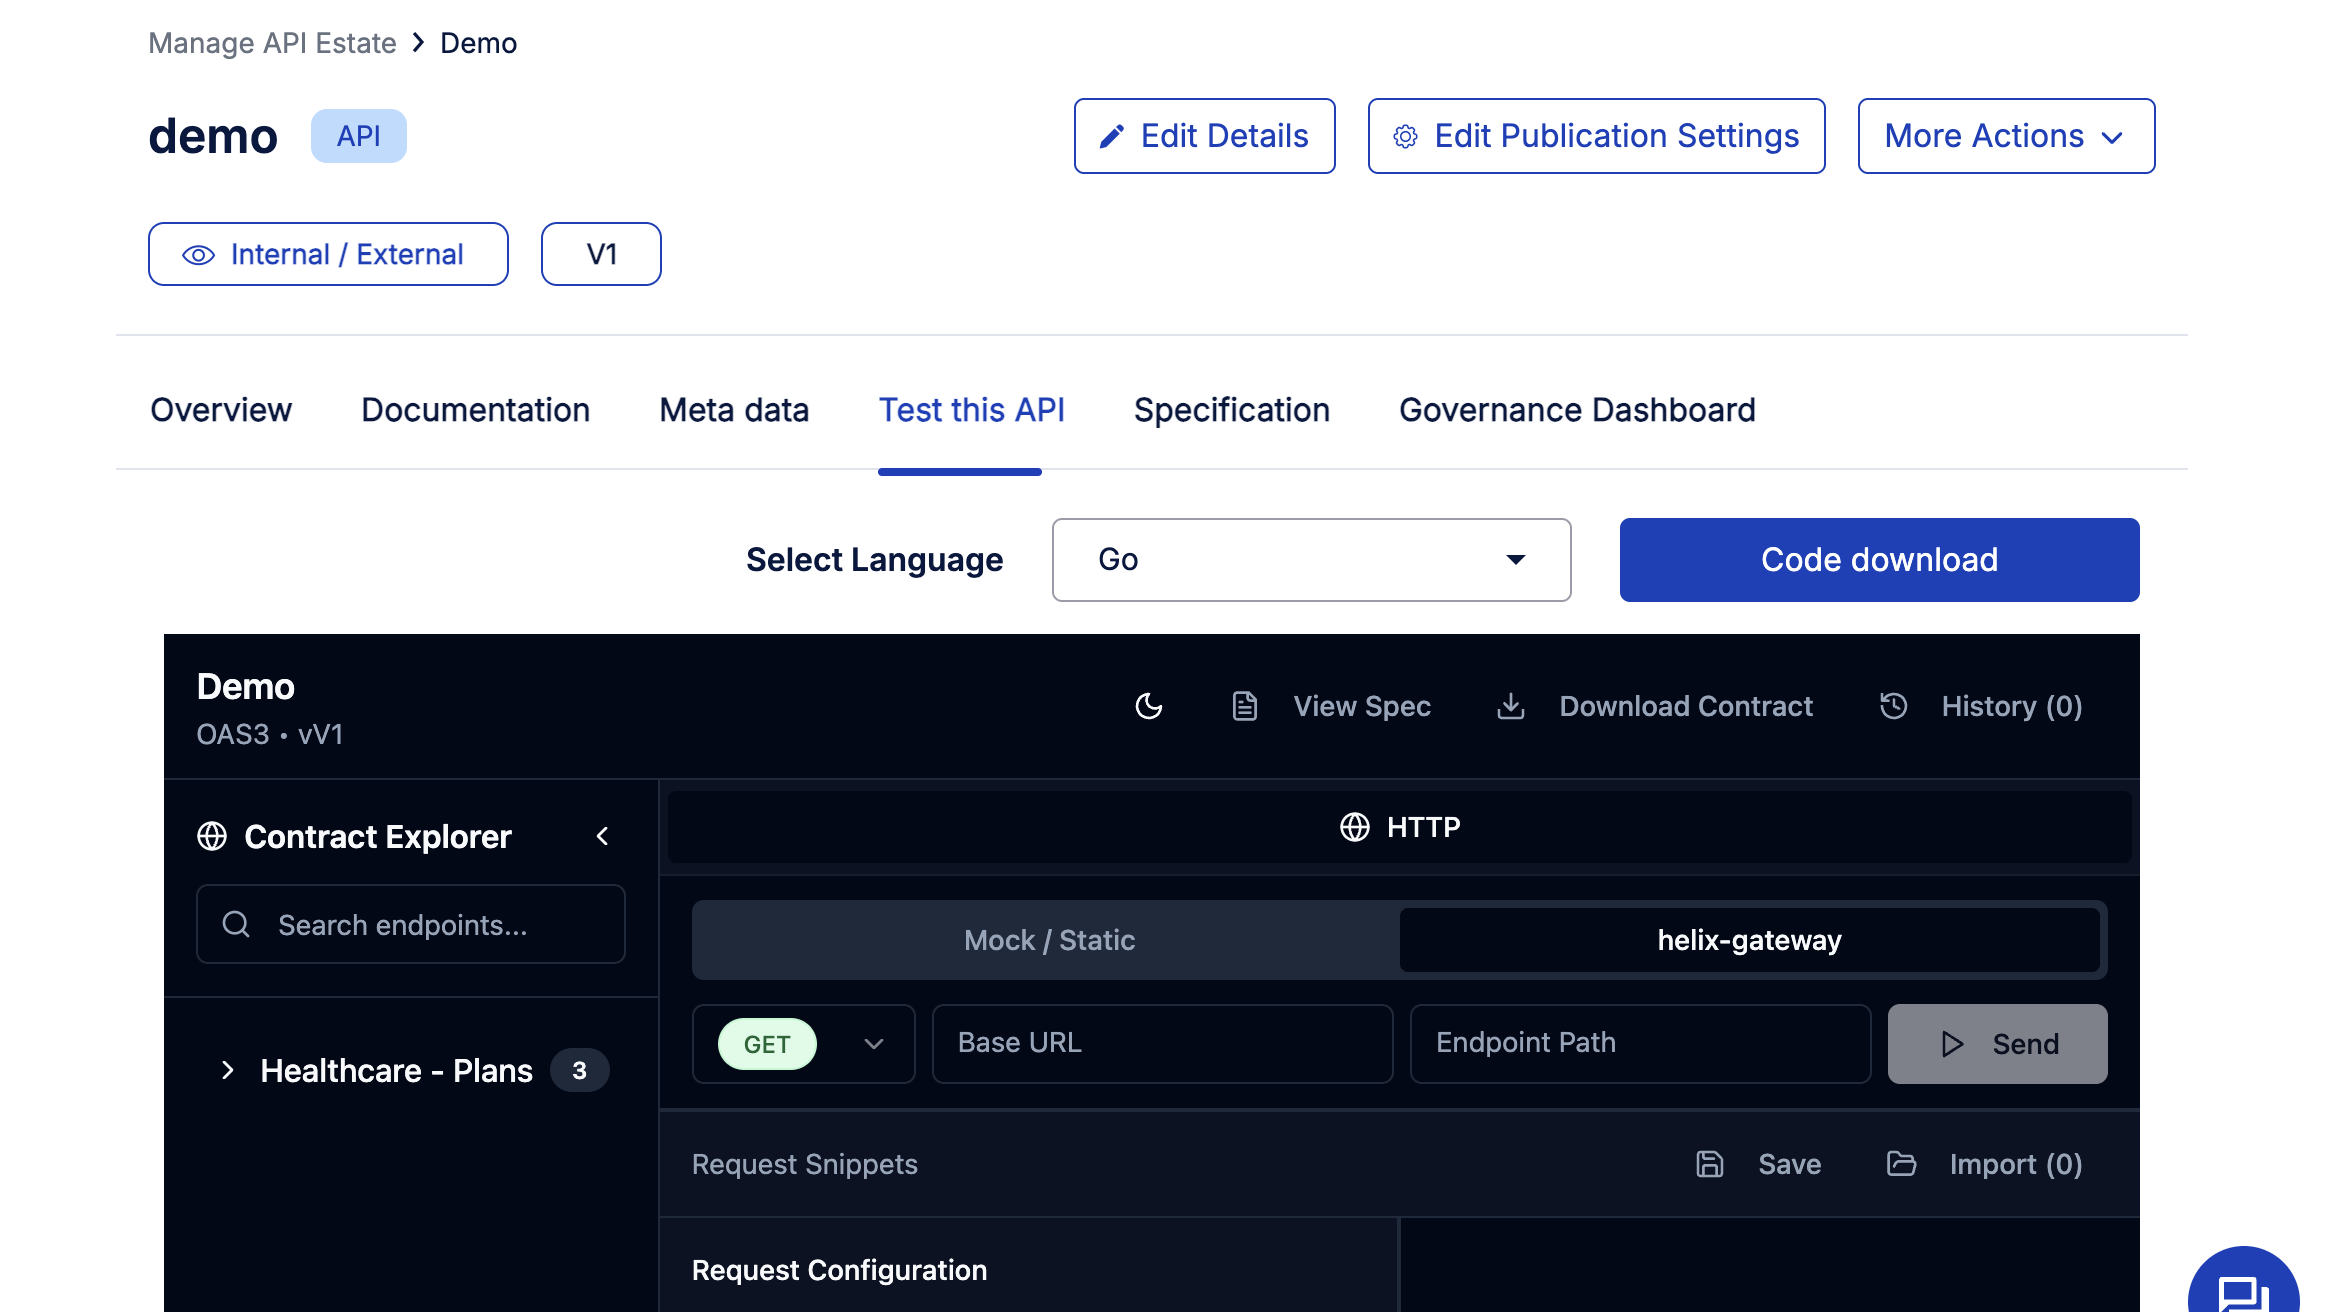
Helix Gateway includes a built-in sandbox, allowing developers to test APIs without leaving the platform. In the sandbox, you can simulate real API calls, review request and response data, and generate client-ready code snippets in multiple languages like Go, C, Dart, or JavaScript.
Use the Contract Explorer to navigate available endpoints, configure parameters, and send test requests directly through the HTTP client. You can also download API contracts, view specifications, and access mock servers for static testing.
This feature helps teams verify deployments, troubleshoot issues, and accelerate integration, ensuring every API performs exactly as designed before going live.
4. Governance dashboard and compliance
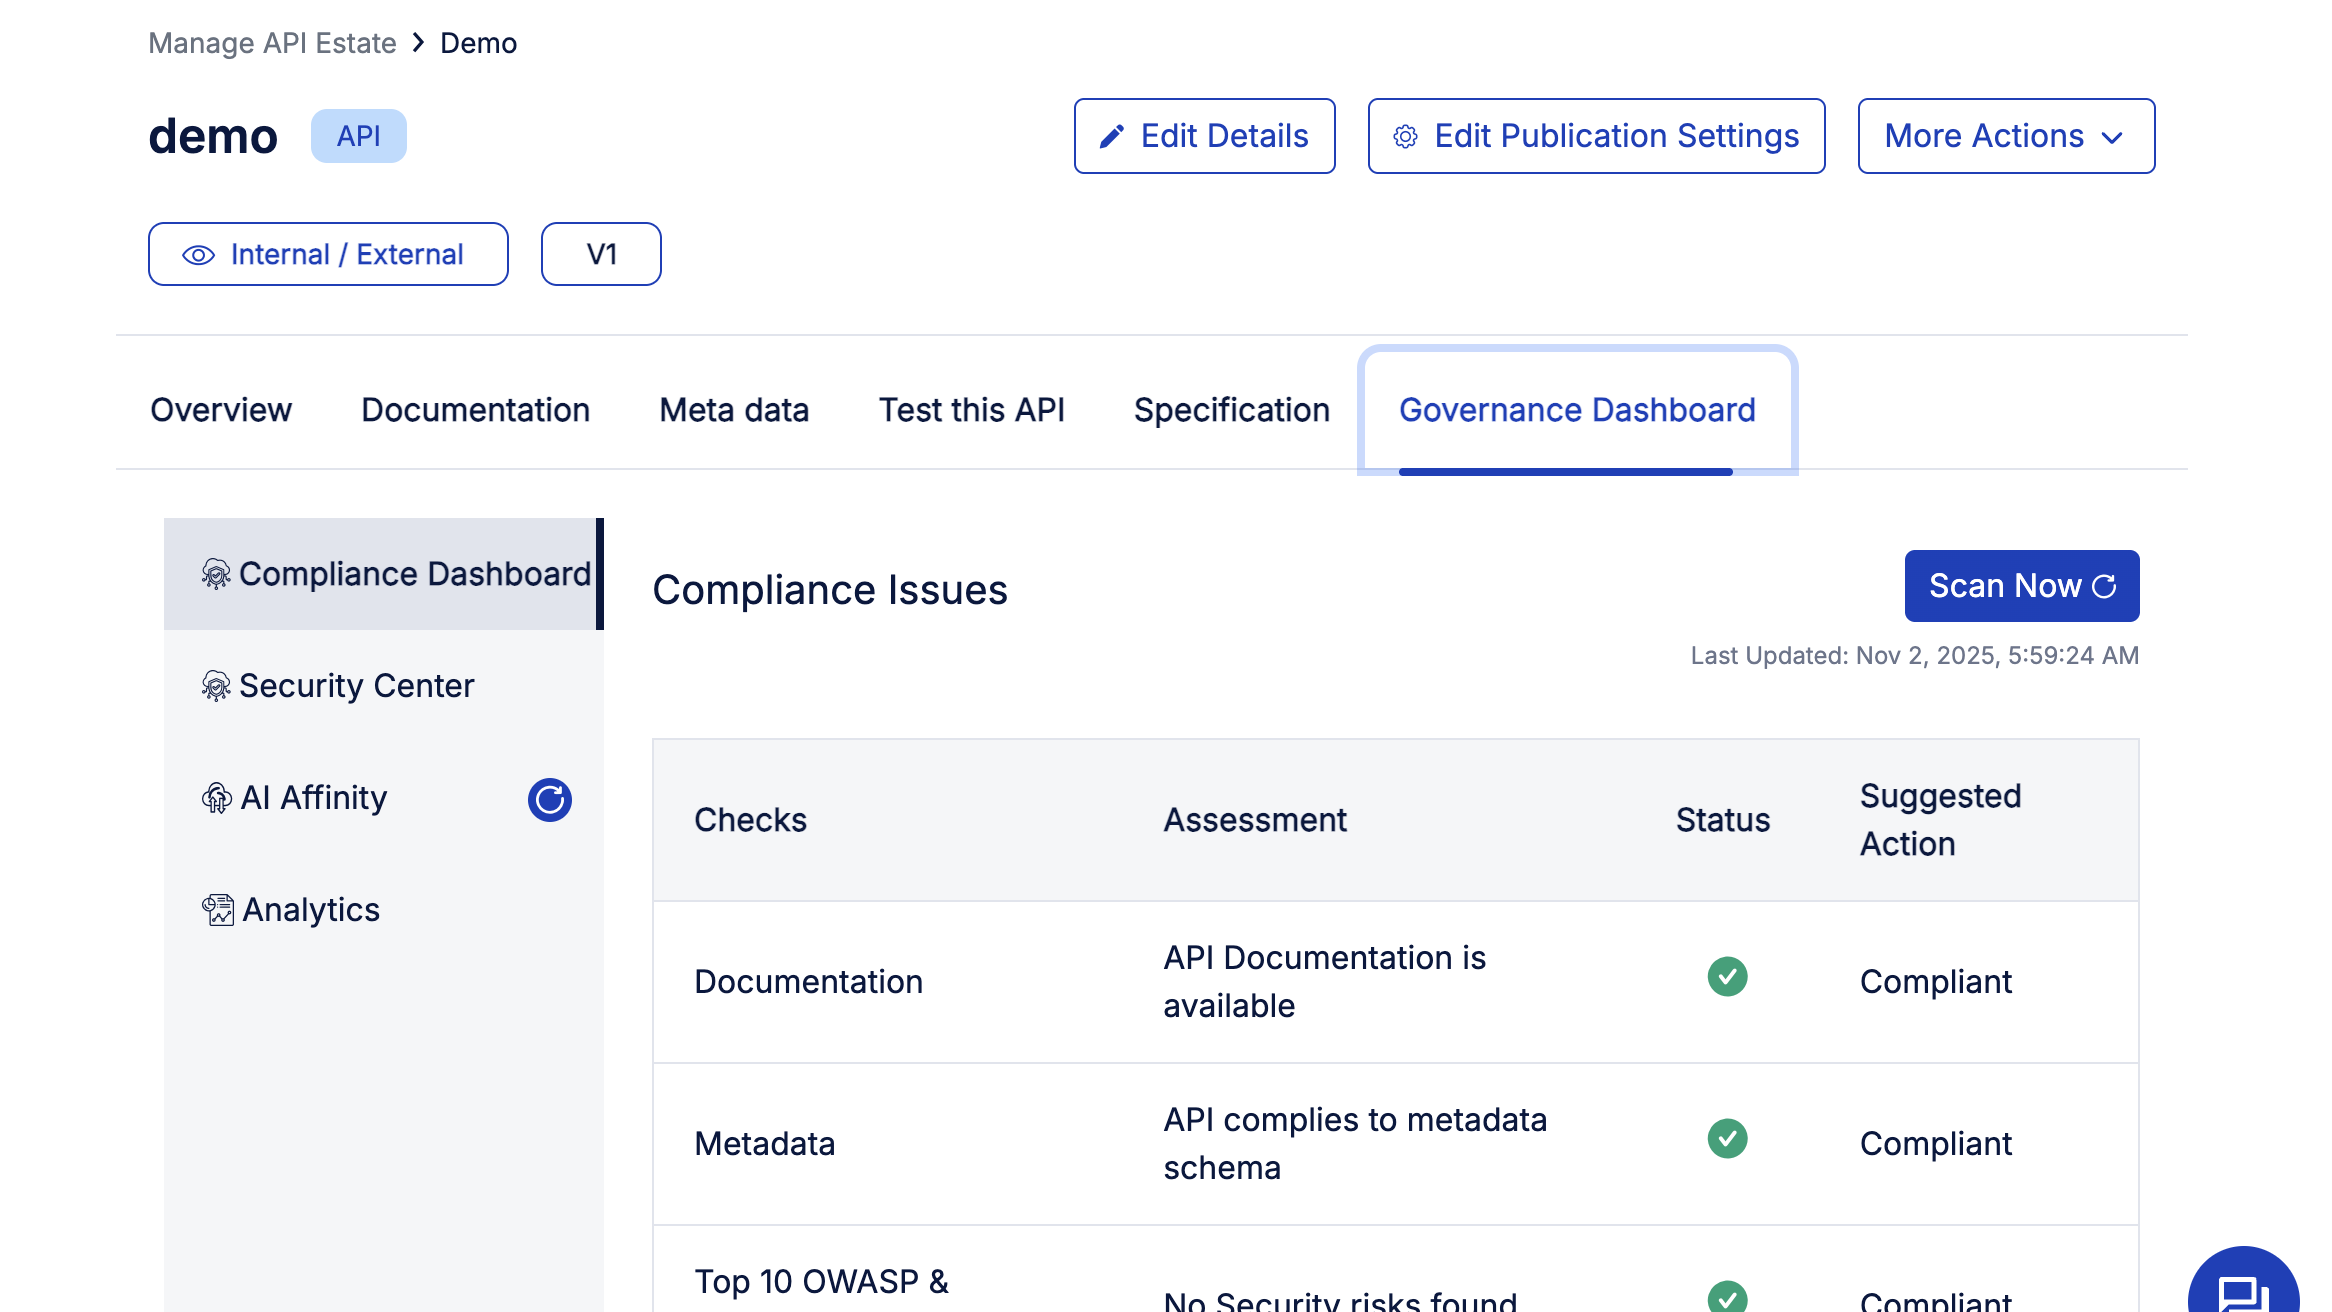
Helix Gateway’s Governance Dashboard provides a view of your API’s compliance, security, and duplication. You can easily run different security tests, like Top 10 OWASP and Linting, to find any security gaps, while also checking for different compliance issues.
Additionally, the AI-affinity feature allows you to find duplicate APIs, which can help in removing APIs that perform the same functions. The analytics layer ensures you have a complete overview of API usage for proper tracking.
Final thoughts
Helix Gateway redefines how teams design, deploy, and manage APIs, turning what used to be a complex, multi-tool process into a fast, guided experience. From creation to governance, every step is visual, intuitive, and built to help developers move from idea to production in minutes.
Whether you’re managing a handful of internal APIs or scaling across multiple business lines, Helix gives you complete control, with built-in compliance checks, real-time analytics, and AI-readiness baked in. It’s not just an API gateway; it’s a smarter way to build and govern your API ecosystem.
Ready to experience it yourself? Explore Helix Gateway and see how effortless API management can be.
FAQs
1. What is an API Gateway?
An API gateway acts as a single entry point that manages, routes, and secures requests between clients and backend services. It handles authentication, rate limiting, traffic control, and monitoring—simplifying how APIs are exposed and consumed. Essentially, it streamlines connectivity and ensures your APIs are consistent, secure, and high-performing across applications.
2. Why use Helix instead of a legacy gateway?
Helix Gateway is lightweight, faster to deploy, and built for today’s API-first architectures. Unlike legacy gateways that require complex setup and heavy infrastructure, Helix offers a plug-and-play experience with zero DevOps overhead, built-in compliance checks, and AI-readiness—helping teams deploy and manage APIs effortlessly, without the usual operational complexity.
3. How much setup time is required?
Setting up Helix Gateway takes just minutes. The intuitive API Wizard guides users through design, configuration, and deployment without requiring complex infrastructure or scripting. Once deployed, teams can instantly apply policies, monitor usage, and make updates through a simple interface—eliminating long setup cycles typical of traditional API management tools.
4. Can Helix support multi-cloud or edge deployment?
Yes. Helix Gateway supports flexible deployment models across public cloud, private data centers, and edge environments. Its lightweight, container-friendly architecture allows teams to deploy APIs close to where users or data reside, reducing latency and improving scalability, without the compatibility issues that typically arise in hybrid or multi-cloud setups.
5. How do I monetize my APIs via Helix?
Helix makes API monetization seamless by allowing you to publish APIs as products directly from its unified dashboard. You can define usage tiers, pricing models, and subscription plans while tracking real-time consumption and revenue analytics. This enables organizations to convert APIs from operational assets into measurable, revenue-generating business products.
6. What skills do I need to get started with Helix?
You don’t need to be an infrastructure expert to use Helix Gateway. Basic knowledge of REST APIs and OpenAPI specifications is enough. Its intuitive interface and no-code workflows handle complex configurations automatically, enabling developers, architects, and even non-technical users to design, deploy, and manage APIs confidently.
7. Is Helix only for large enterprises?
No. Helix is designed for scalability but flexible enough for teams of any size. Startups can leverage its simplicity and speed for quick API launches, while large enterprises benefit from built-in governance, security, and analytics. Whether you manage five APIs or five hundred, Helix adapts to your scale and maturity effortlessly.

.svg)
.avif)